Before and After: A 20-Year-Old Bathroom Gets a Stylish and Sophisticated Head-to-Toe Redo

No-demo redos have a lot going for them: They’re (usually) rental-friendly, they’re budget-friendly, and they’re time-friendly, too. But sometimes, for a space you really dislike, it can be cathartic — and necessary — to tear everything out and completely start from scratch.
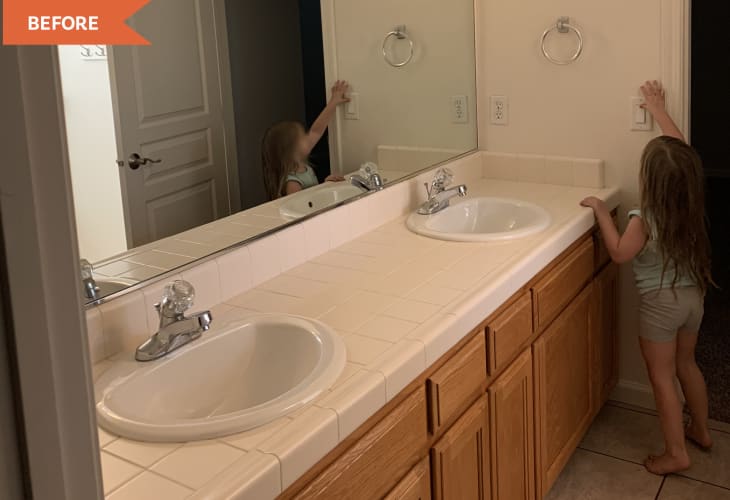
Leslea Ferguson’s (@aheartfilledhome) daughters’ bathroom involved some major demo because the builder-grade space was begging for a fresh start, especially the vanity. “The tile counter and floor, lighting, large mirror, and faucets were original to the house when it was built 20 years ago,” Leslea says. “It made me feel uninspired.”
She and her husband, Nick, decided to bust up the tile counters, the floors, and the wall behind the vanity (they salvaged the cabinetry!) for a more contemporary look. The Spring 2022 One Room Challenge gave them the perfect opportunity to take this big project on.
The couple first replaced the chunky square tile countertop with a butcher block that they cut to size themselves, then cut holes for new rectangular sinks. Leslea stained her new counters using Varathane’s Special Walnut before sealing it with five coats polyurethane for an extra-durable, bathroom-friendly top-coat. She loves the new counters. “This color is a beautiful neutral color that looks SO good on the sanded butcher block,” Leslea writes on her blog.
As for the cabinets beneath, they’re the same oak ones in the “before” photos, just sanded and painted a creamy white (Sherwin-Williams’ Pure White) with new cabinet pulls attached.
Leslea’s favorite part of her daughters’ new bathroom is the wall behind the vanity, which she dressed up with gray subway tileand matching dark gray grout. To save time, Leslea applied the tile with the help of an adhesive tile mat. “We were surprised by a hole in the wall behind the large mirror, but were able to patch it before adding the wall tile,” Leslea recalls — a minor setback for a major design comeback that makes the whole room feel more spacious.
Other major upgrades in the space? The new rectangular mirrors, which are a luxe step up from the builder-grade sheet mirror, and a new white and brass wall sconce. Although it required a bit of patience to install, the new light has a more contemporary feel than the 20-year-old multi-bulbed one from before.
“Moving the vanity light required removing some drywall,” Leslea said on her blog. She used a level to draw straight lines down from the previous overhead location then used a multi-tool to cut through the drywall to move the light box between the mirrors, then patched the drywall before adding the wall tiles.
The floors were also re-tiled using a hex tile in a dark slate shade that’s similar to the wall tile. “The toughest project was removing all the original tile; once that was done, re-tiling was straightforward but time-consuming,” Leslea says of her project, which took about eight weeks total.
On the other wall in the bathroom, Leslea swapped a basic set of hooks for a board and batten treatment and antique brass hooks. Leslea says the upgrade “gives a custom look and provides more functional storage.”
Leslea painted the un-tiled walls and door light pink (Clare’s Wing It), a delicate color that’s both kid- and adult-friendly. Other finishing touches include a new overhead light fixture, new floral artwork, and a new linen shower curtain.
“I wanted to give my girls a beautiful bathroom with color and beautiful character,” Leslea says. She’s proud of how all of the DIY details — especially the new counters, mirrors, and tile wall — came together. “They were time-consuming but really make such a visual impact!” she says.
This project was completed for the Spring 2022 One Room Challenge, in partnership with Apartment Therapy. See even more of the One Room Challenge before and afters here.
Inspired? Submit your own project here.
