
I Turned a Bathroom Staple into the Maximalist Headboard of My Dreams
If you’re a millennial or Gen X-er, you might remember the floral-on-floral trends of the 1980s and 1990s that involved matchy-matchy rooms with coordinating upholstery, linens, borders, wallpaper, pillows, and more. Well, you know what they say: Everything old is new again. Those old-school florals are gaining popularity again through trendy takes on maximalism and cottagecore, and I wanted to bring that look to my home’s guest bedroom with a surprisingly DIY-friendly upholstered headboard.
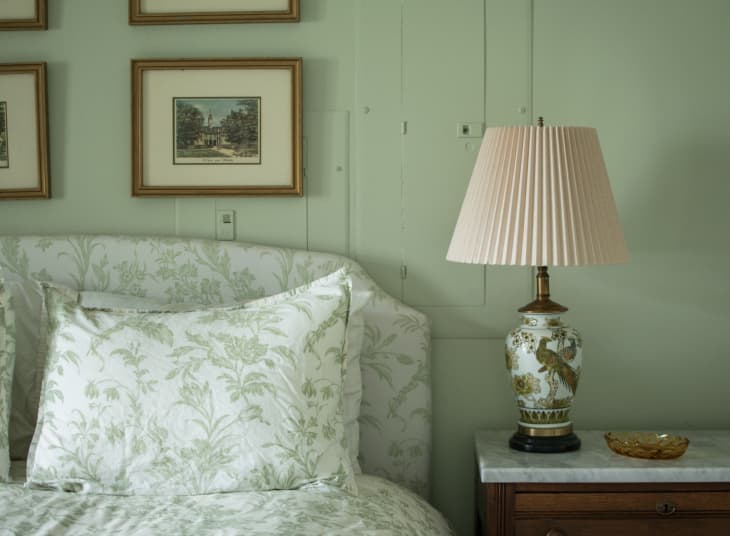
When I painted the guest bedroom a soft green (Benjamin Moore’s Hollingsworth Green) and stumbled upon a Laura Ashley — yes, that Laura Ashley, of the famed 1990s matching florals — duvet cover that matched the color perfectly. I’d originally planned on sourcing a wood headboard for the bed, but once I saw the duvet print and the walls next to each other, I had another idea.
I was reminded of the famous print-on-print paradise that is The Greenbrier resort, which was given its maximalist look by iconic interior decorator Dorothy Draper. I wanted to pull a Dorothy and try to squeeze every last drop out of that print with a DIY upholstered headboard.
I initially planned on buying a second duvet to use as my upholstery fabric, but I realized Laura Ashley made a shower curtain in the same print and that seemed like a more durable option for this use. It was also way, way cheaper, at about a third of the price.
For the actual headboard, I took to Facebook Marketplace. Because it was only serving as a foundation, it didn’t need to be attractive — it just needed to be affordable and in decent condition (and sans bed bugs).
I looked specifically for a headboard that had a simple silhouette with a little bit of an arch or curve, and that didn’t have tufting. A flat surface would make this project as beginner-friendly as possible.
Headboards aren’t hard to find on Facebook Marketplace, and I found multiple options that could have worked by searching “queen upholstered headboard.” My shopping tip: I gravitate towards listings with good photos and seller reviews, particularly if I’m buying an upholstered piece. I also always check to see how long items have been listed to see if I have any negotiating power.
Eventually I landed on a solid gray, slightly arched headboard listed for just $60 that had been up for several weeks. I was able to talk the seller down to just $45. Win!
To pull the project together, I used a staple gun and batting in addition to the headboard and shower curtain. I initially cut the batting to roughly the size of the headboard, then stapled it taut around the entire perimeter of the headboard. It’s an easy one-person job, especially if you’re not using the highest-quality headboard (which means it will be lightweight!). You can do one to two rounds of batting depending on how padded you want the headboard to be.
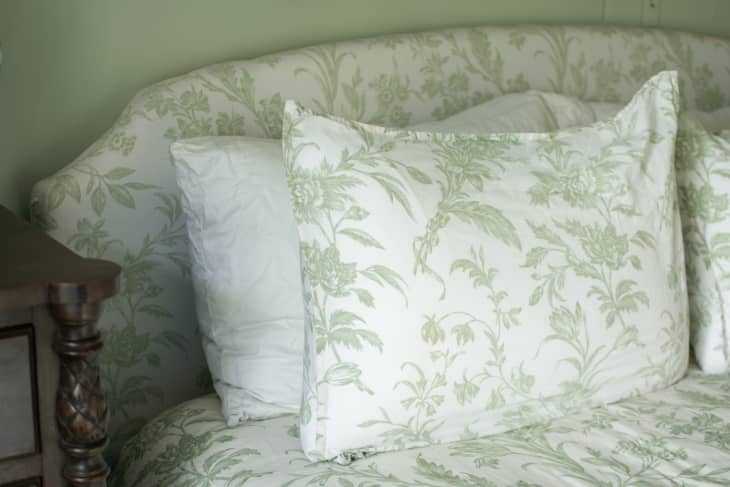
With the batting in place, I did a rough trace of the headboard onto the shower curtain, then repeated my process of stapling it around the headboard. Fortunately, this isn’t a DIY that requires perfection. Even if your corners aren’t exactly straight, that’s OK — printed fabric hides a multitude of sins!
Once the headboard was complete, I gave it a coat of Scotchguard to help protect it from stains. All that was left was attaching it to the bed frame. The result is a luxurious-looking headboard that only I (and now you!) would ever know is a budget-savvy DIY. The whole thing cost only a little more than $100 to create.
Every time I walk in this room, I’m delighted by the calming color and the elegant style of all the green prints on the duvet, the pillows, and the headboard. It’s matchy-matchy in a way that would make Dorothy Draper proud. As she once said, “Decorating is just sheer fun.”