Before and After: A ’90s Bathroom Ditches Sailboats for Streamlined Tile in a $9,000 Total Redo

Although it can be fun to lean into a theme, especially in a small space like a bathroom, it’s definitely not for everyone.
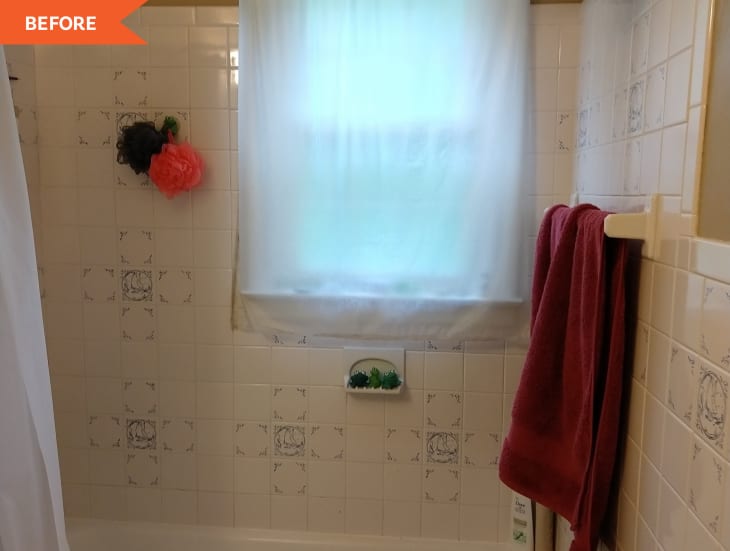
Homeowner Jennifer Cote’s (@sleepyjen) bathroom was a little too heavy on one motif for her liking: “If you liked sailboats, this bathroom was for you!” she says. Unfortunately, she did not share that love with the former homeowners, and this bathroom — the only full-sized one in her home — was full of sailboats on the wall and tub tiles.
“While the bathroom was fully functional, it had seen better days,” Jennifer says. Her home was built in 1953, but the bathroom was likely last touched in the ’90s. Its vinyl floor was peeling and chipping, and the tub fixtures were becoming grosser over time, Jennifer explains, because they couldn’t be replaced without replacing the valve system they were on. “Everything felt crowded, dusty, and meh,” she says.
In addition, the room had a general feeling of dampness. The one bath towel bar was located on the inside of the shower, the hand towel bar was right next to the sink, and Jennifer recalls that it felt like nothing in the room ever fully dried. Since living there, she had replaced the toilet, light and faucet herself, but “they were all bandaids in a pretty ugly room,” she says.
In 2019, Jennifer began ordering materials for a reno: a new medicine cabinet, gray subway tiles for the shower, hooks to replace the towel bar from before, a rounded curtain rod and fresh white shower curtain, and fast-drying Turkish cotton towels.
The pandemic put a pin in the project for about three years, but “by 2022, when I started looking for contractors who had time and called back, I had a good vision of what I wanted the room to be,” Jennifer says. Their bathroom was a combination of professional installations and DIYs by Jennifer and her husband.
“I tore the walls out, installed wallboard, painted, replaced trim, and removed and installed a new floor,” Jennifer says. “Because we did a lot of the room ourselves, it took a while and was, let’s say, one big learning curve.”
Jennifer tore out the walls, which were made of cement board that had been mounted on shims that were mounted on studs, using a hammer and small crowbar. “My hands hurt every day doing it,” she says. She also learned how to install drywall for the project and is proud of how her slow but careful work turned out.
One of her friends helped with the electrical. “What I thought was going to be just replacing one old wire turned into a two-day event because we had to reorganize a bunch of wiring,” she says. Another setback: Jennifer lost her grip on the existing toilet after taking it out for demo, cracked the base, and had to replace the whole thing.
The new floor is actually a black and white stick-on vinyl tile made to look like vintage hexagon tile. Jennifer says if she were to do the project over again, she would go for ceramic tiles. “We decided to use peel-and-stick vinyl to test-drive a design, and it’s just fine, so of course now I wish we’d gone for it, but it’s a minor non-issue,” Jennifer says. And she’s proud that they did a ton of the work themselves.
“I still can’t believe I did a majority of this room myself,” she says. “I was super focused, knew what I wanted, and managed to stay patient so that things like drywall seam taping didn’t turn out disastrous.”
Jennifer and her husband hired pros to demo and reinstall the shower, reglaze the beat-up but cast-iron tub, and install most of the plumbing. “I installed a new toilet, but we had some valve issues that I eventually gave up on and had repaired professionally,” she says.
Her advice for hiring pros? “Hiring young contractors is a good way to help them grow their careers and get what you need sometimes faster,” she says. “I’d called many long-established local contractors about our shower tile, and in many cases they didn’t have time for six months or more — or didn’t even call back. The tiler we went with was so careful [and] cut no corners, in part because that’s just who he is, but he also had a lot to gain from the experience as opposed to someone who’s been at it so long they always have a long list of potential clients.”
With labor and materials included, the project cost about $9,000. It took longer to complete than Jennifer had hoped, at about three months of construction and installation. “If you live in a small house like ours, make sure you’ve got a good shower backup plan when things stretch on,” she says. “Kidding aside, being patient with the project and yourself makes a lot of difference.”
Jennifer is proud of all of the patience hard work that went into her bathroom, and she learned a lot along the way. “I have done a lot of house projects but learned a lot of new skills with this one — skills I didn’t even originally want to know,” she says. “Originally we’d planned to outsource the whole thing, but I’m so glad we didn’t.”
Now she can boast about her new DIY skills all while showing off her functional bathroom that totally fits her personal style.
Inspired? Submit your own project here.
