
A Beige, Water-Damaged Bathroom Is Now Modern and Functional Thanks to Easy DIYs
Bathrooms from the 1950s and ’60s are known for their pastel (especially pink)-colored tiles, while 1980s bathrooms had shell-shaped sinks, and ones from the 1990s had oak cabinetry, sheet mirrors, and flush-mount fixtures.
What will the 2020s bathrooms be known for? Sleek tile, framed-edge mirrors, and brass hardware are all among the common trends in some of the most stylish ones.
Selene Teitelbaum’s (@selenebuildsthings) bathroom renovation has all three. What started as a “beige and boring” bathroom from 1981 is now a much more contemporary, pattern-filled space.
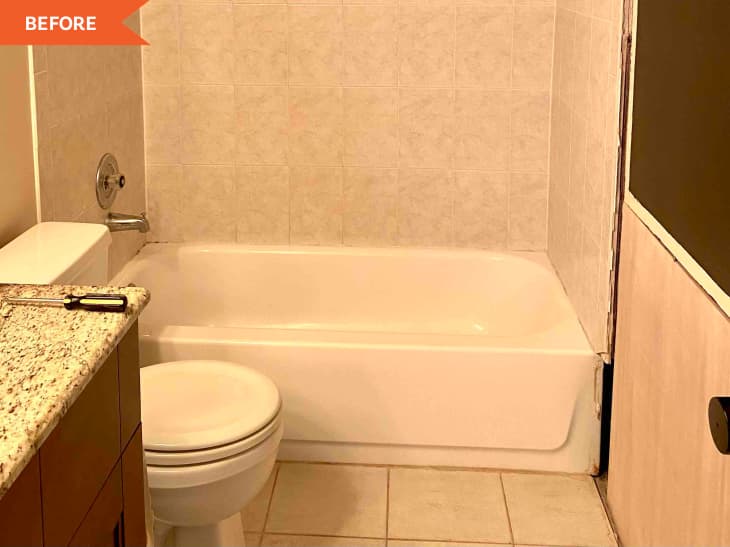
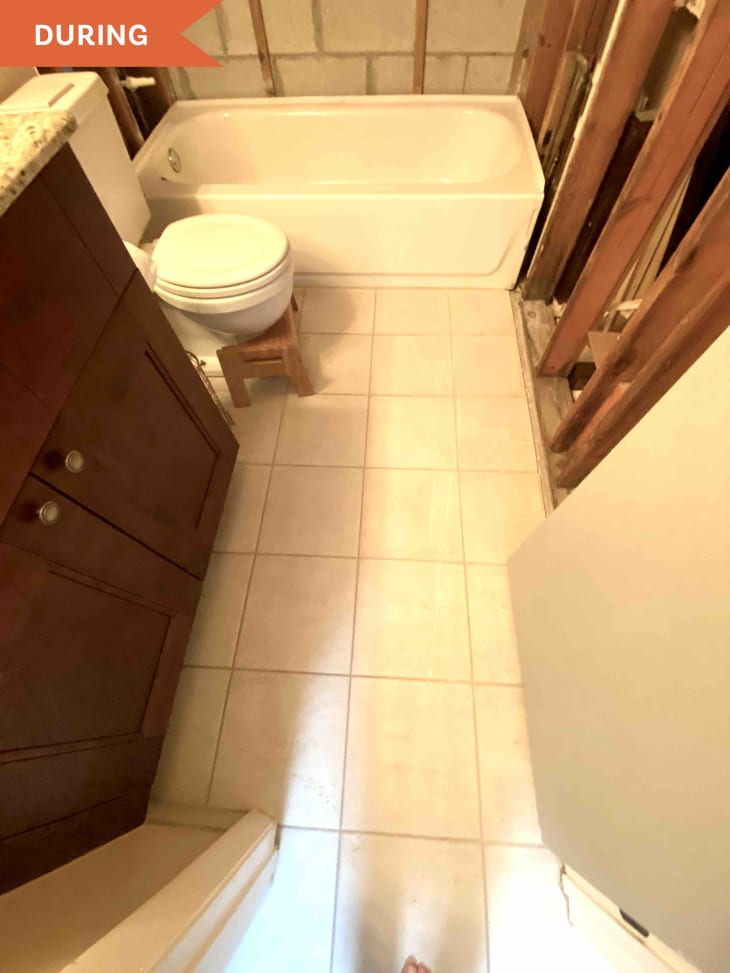
The Bathroom Had an Overall Lackluster Appearance That Needed Functionality
Selene wanted to make a change to the bathroom because of its overall lackluster, dated appearance. It had a rusty mirrored medicine cabinet and a plain sheet mirror above the vanity.
It also had a bare-bulb light fixture “that gave off a yellow glow,” Selene explains. “The sink faucet was silver with a granite counter and a fake mahogany wood cabinet. The shower tiles were large and plain — there were no niches, and the hardware was basic with a silver finish.”

Another Reason for the Redo Was a Surprise That Caused Major Damage
But Selene says the bathroom got daily use, and she and her husband, Devin, partly needed to make a change out of necessity.
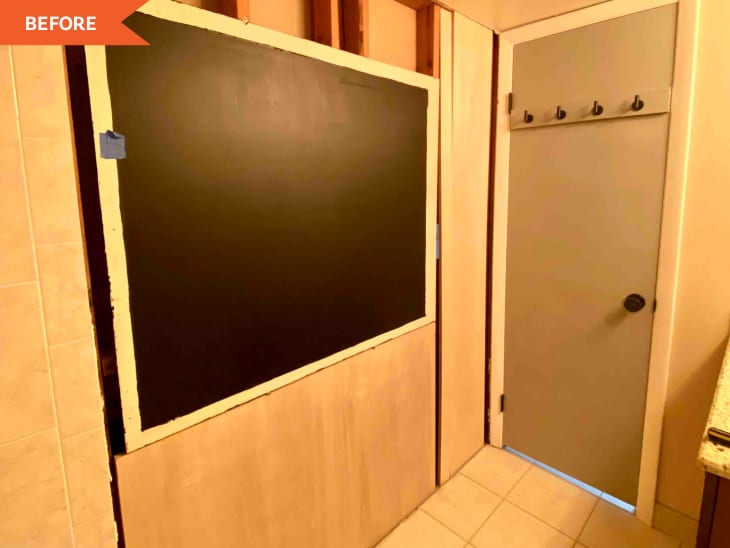
“We discovered a leak in the house, which caused major damage to a large part of the house, including this bathroom,” she explains. “We had to rip out all of the drywall up to four feet high because of the leak. At that point, we decided to completely gut the bathroom and start fresh!”
Selene gutted everything except the vanity and the floors and took on the mostly DIY redo herself. “The only outside help I used was a plumber to install the rough-in and the shower/tub fixtures,” she says.
After knocking down the old drywall, “the only major surprise was having to move the electrical box for the light fixture in order to get it centered,” she explains, but her electrician sister-in-law walked her through the process of moving it.
An Accent Wall and Intentional Organization Were Made Possible by a Complete Gut Job
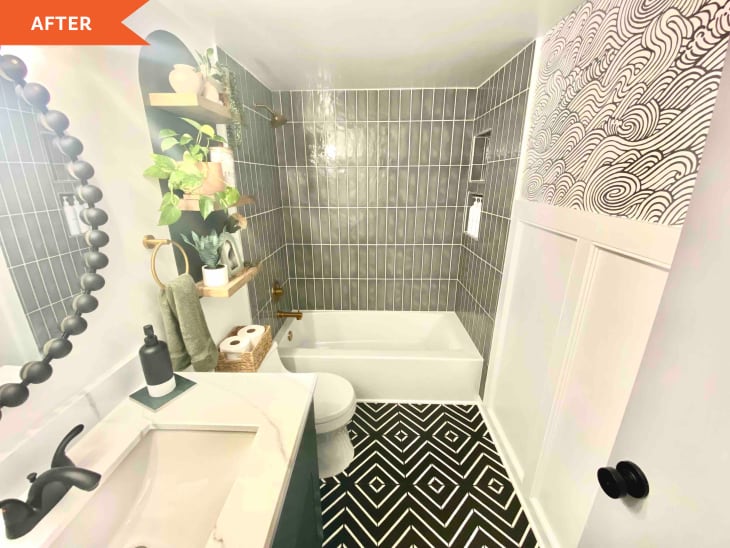
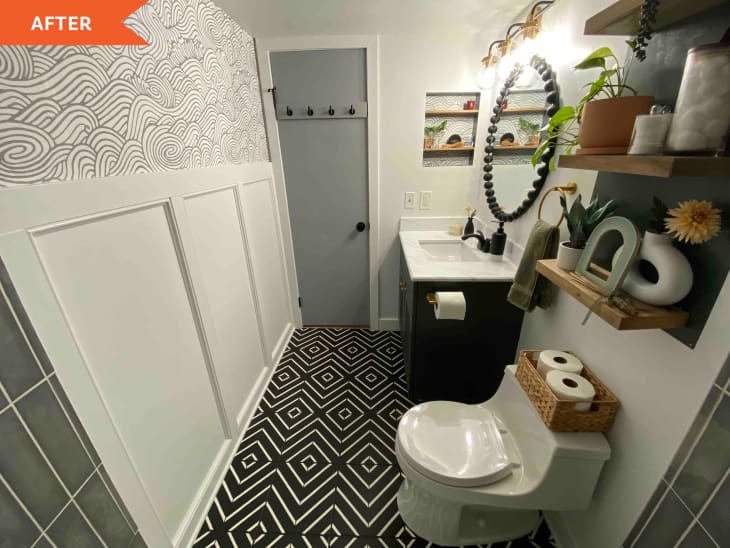
The next step was hanging drywall, a DIY first for Selene, which was easier than expected. What was more difficult was taping and skim coating the drywall. After the walls were up, Selene added board and batten wainscoting with picture frame moulding and painted everything white (Behr’s “Frost”). Behind the door, she pasted a wave-patterned wallpaper. She added new trim around the door and new baseboards.
For the wall above the toilet, Selene built three floating shelves and painted a green arch behind them to help give them some extra punch. Selene also painted her vanity cabinet the same shade of green (Behr’s “Woodland Moss”) after adding fluting to the doors; once the paint was dry, she swapped the old chrome knobs for brass.
Paint also helped update the rest of the vanity: Selene used a faux marble finish on the granite countertop from before (sealed with epoxy), and she spray-painted the original faucet matte black. She made a dupe of a mirror she had seen and liked, using a plain round mirror and wooden bauble half-rounds that she also spray-painted black to create her DIY version. To the left, Selene took out the old medicine cabinet, wallpapered the inside, and added two thin shelves.
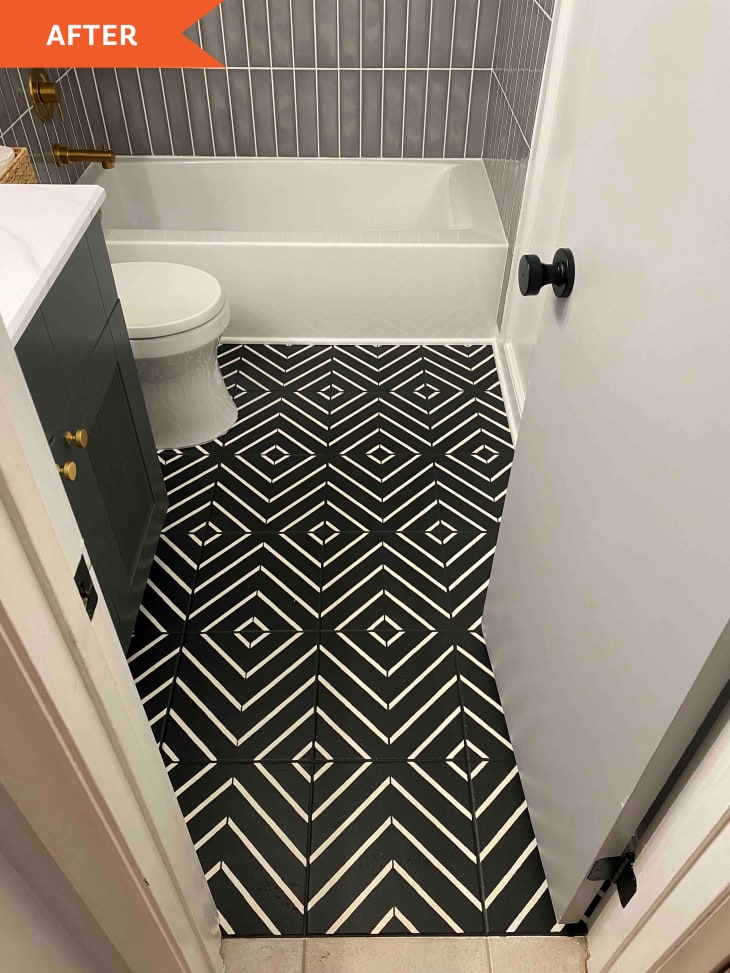
As for the bathing area, Selene and Devin used a kit to waterproof the shower and did all of the tiling and grouting together. They used a 3 x 12 dark gray subway tile, stacked vertically for a modern look. The couple also built in two useful shower niches, which blend into the shower wall.
For the floors, paint came to the rescue once again for a budget-friendly fix. “I decided to paint and stencil the floor instead of replacing the existing tile,” Selene says. She used a 12 x 12 stencil, Sherwin-Williams’ “Black Magic” paint, and the same white paint as the walls to get the look.
Upgraded Features and First-Time Diys Redid This Bathroom for Under $4,000
Lastly, Selene added a brushed gold toilet paper holder and a towel ring. Her all-in budget for the bathroom was just under $4,000. “I’m proud that most of the projects I completed within the bathroom were things I’d never done before,” Selene says. “I’d never hung drywall, installed wallpaper, built floating shelves, painted a cabinet, stenciled floors, or epoxied a countertop. The only thing I had some experience in was painting and tiling.”
Selene says she learned a lot from YouTube, blogs, and social media. “I had never picked up a power tool before a year ago, but was determined to learn new skills and try new things,” she says.
Her advice to others? “Just go for it,” she says. “Start with something small that is low-risk, and gain some confidence. Remember that any mistakes you make, and you will make mistakes, are fixable. Paint is just paint! None of these things is technically difficult — they just take time and patience. I learn from all of my mistakes and get better every day. The amount of satisfaction you get after completing a project yourself is so worth it!”
Inspired? Submit your own project here.
Shop This Before & After


- Paints
- Products
- light fixture
- Ryker Abstract Ross & Main Wallpaper
- Black and Gold Vanity Light Fixture
- Fog Ceramic Tile from Floor & Decor
- Schluter Waterproofing Shower Kit
- 12×12 Inch Geometric Tile Stencil
- Gold Wall-Mounted Toilet Paper Holder from Wayfair
- Gold Wall-Mount bathroom Towel Ring from Wayfair
- Unfinished 2 Inch Half Wooden Beads from Amazon
- Marble Epoxy Countertop Kit from Amazon