
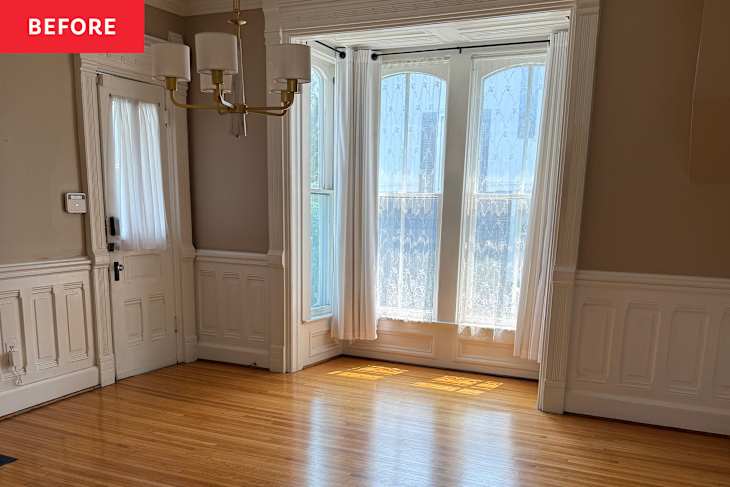
A 150-Year-Old Home Got a Bold, Color-Drenched Dining Room Redo
Historic home renovations have been known to test people’s patience during DIYs and, sometimes, encourage pivoting mid-project. When Cassandra Noel and her husband were ready to become first-time homeowners, they immediately fell in love with a 155-year-old Italianate home for its character and charm. They moved in less than a year ago, and they’re already making the house feel like them in every way.
“We’d been living in a super-modern high-rise apartment for the past four years and were craving somewhere with character. This completely fit the bill — it’s like a life-sized doll house,” Cassandra says.
Their new home — built somewhere between 1871 and 1873 since the records were lost in The Great Chicago Fire — has the traditional layout of a historical home. The dining room is the center of the house, between the parlor and the kitchen, meant for hosting guests — and it’s actually the largest room.
“We couldn’t wait to host in here,” Cassandra notes. But they had some work to do first.
Lead Paint Was the First Roadblock
What excited the couple the most about the space were the board and batten wall details, the crown molding, and the bay window. But “unfortunately, the original board and batten was painted over quite a few times, and the walls were painted a very sad beige.”
Cassandra and her husband had hoped to restore the original wooden board and batten and trim. But they “quickly discovered that it had been painted with lead paint and sealed. So, sanding it down wasn’t an option,” Cassandra explains.


Not Renovation, but Restoration
Even though Cassandra couldn’t sand the wood to show off the original architecture, she and her husband still wanted “the space to fit the character of the home.”
The couple researched what the popular paint colors were when their home was originally built. They were surprised to learn that one of the colors was terracotta — which worked out perfectly for Cassandra because her “all-time favorite paint color is a Roman Clay called ‘Costes’ by Portola paints.” Because the color is a muted terracotta with a touch of rose, they decided to lean completely into the “almost otherworldly feel,” and color-drench the entire room.
“The goal wasn’t renovation; it was to restore and highlight the home’s natural beauty,” Cassandra explains. “We knew we wanted to host here, so we wanted it to make a statement, but still feel warm and inviting.”
As they started the painting process, they took off each outlet cover and saw numerous paint colors the previous owners had used. One of the paints peeking through was a shade of terracotta.
It was “almost the exact same color as we were painting the room,” Cassandra notes. “It took our breath away — and definitely felt like a sign we were on the right track.”


Painting Required Patience and Trust
The majority of the transformation process was painting. “My husband is super detail-oriented, so he painted the trim with flat paint.” They wanted to use a flat paint on the board and batten portion of the walls, so they color-matched at Sherwin-Williams to save money and continue with the perfect terracotta shade (similar shades are Sherwin-Williams’ “Redend Point” or “Coral Clay”).
However, Cassandra took on painting the upper portion of each wall with the Roman Clay. “It’s its own art form, and you kind of have to play with the strokes until you find a pattern that you like,” she explains. It requires a putty knife to apply, and because it took roughly four coats to achieve the look Cassandra wanted, by the end of the fourth coat she “could barely move [her] hand.”
It took Cassandra and her husband about a week to finish painting, and there were several moments when they were so exhausted that Cassandra questioned her DIY choices. After the first two coats, Cassandra says it looked a little scary because the color wasn’t coming through how she wanted it to, and because of how tedious applying the Roman Clay was.
“It was our first time painting such ornate trim, so we learned it’s very important to take your time,” Cassandra notes. “It’s better to get the project done a little later than you expected and have a beautiful result than to rush it at the expense of the details.”
But once Cassandra added the final coat of paint, she instantly knew the Roman Clay shade of terracotta was the right choice. “The result [is] absolutely stunning” because she stuck to her vision, listened to her instincts, and trusted the process.


Bringing Out the Old with the New
“Once we finished painting, we swapped out the light fixture, added a sconce, and brought in the furniture,” Cassandra says. Her favorite part is how the terracotta walls and the verdant rug “complement each other so beautifully.”
But the only item they really needed to purchase was a new light fixture to go above the dining table — all of the other furniture pieces were from their previous apartment or had been purchased ahead of the project.
“[But] I’m in love with the result and wouldn’t do a thing differently,” Cassandra notes.
Inspired? Submit your own project here.
Shop This Before & After


- Paint
- Product
- Ojai Handwoven Wool Rug in “Vetiver Green” from West Elm
- Mario Bellini Sofa in “Dusty Rose Chenille” from Eternity Modern
- Livabliss Natural Rattan Floor Lamp from Bed, Bath, and Beyond
- Lenox Dining Chair in “Graphite Linen” from West Elm
- Duo Aged Brass Candlestick Wall Sconce from CB2
- Anais Pendant Light from West Elm