
Before & After: A Young Couple Survives Their First Bathroom Remodel
Kristina and her boyfriend triumphed over one of the most trying of relationship milestones: their first renovation. Kristina points out an important truth about renovations, that even if you’re not working on your forever home, the time and energy that goes into getting a place ready to flip is still monumental. After multiple trips to Home Depot, disagreements and disappointments, and a moment of buyer’s remorse, Kristina and her boyfriend now have a bathroom they can be proud of.
From Kristina: So my boyfriend of over two years bought a house. He had been looking for a multi-unit home for months and months, and then suddenly he bought one. I had given up on accompanying him to countless showings months before. So no, I did not know he had put in an offer, and no I hadn’t had the privilege of hearing of, or seeing the place. This told me all I needed to know about it. In other words, it couldn’t be good.
The feeling I had walking through the house for the first time may have been disappointment, and my outlook may have been dismal, but I faced the challenge ahead of us and saw the potential to share the process. This isn’t a long-term family home since it’s a small apartment, an investment project.
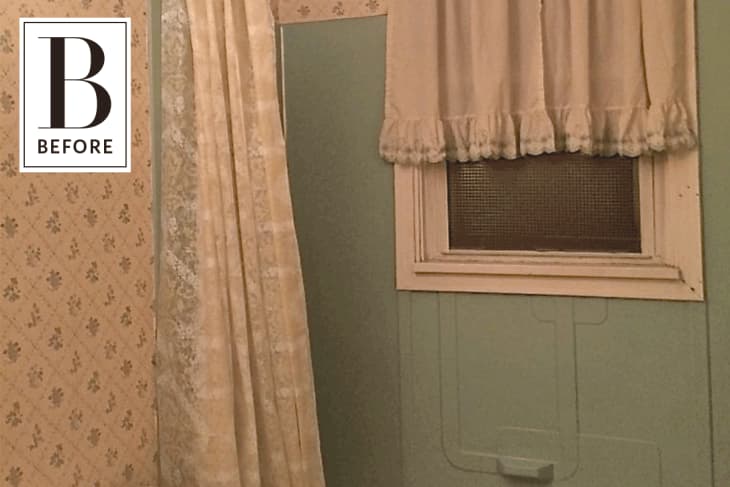
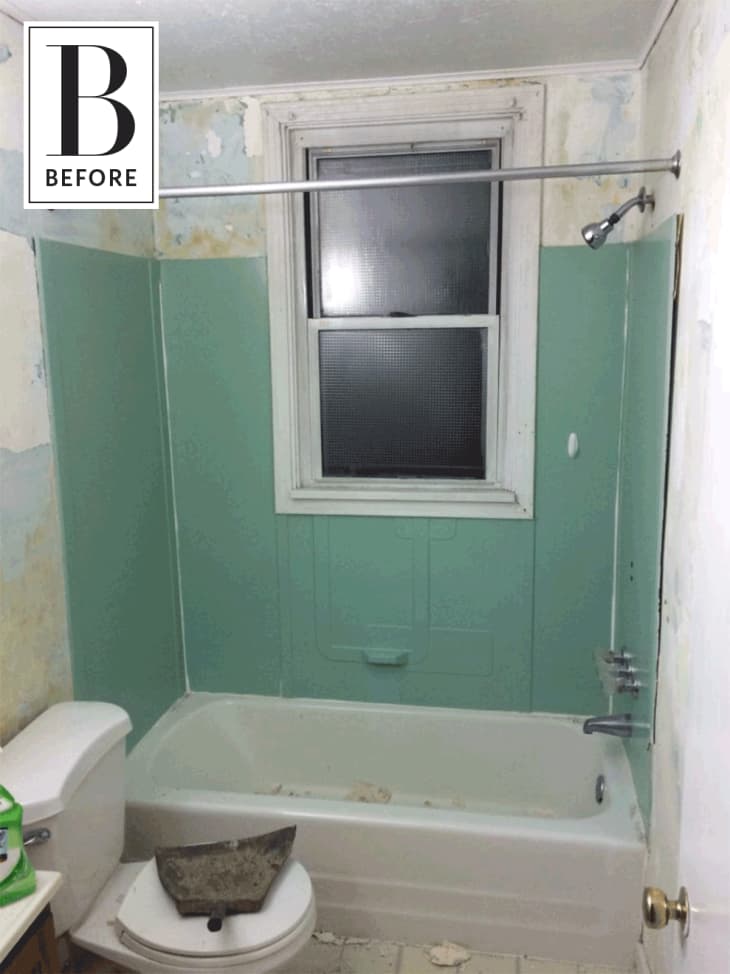
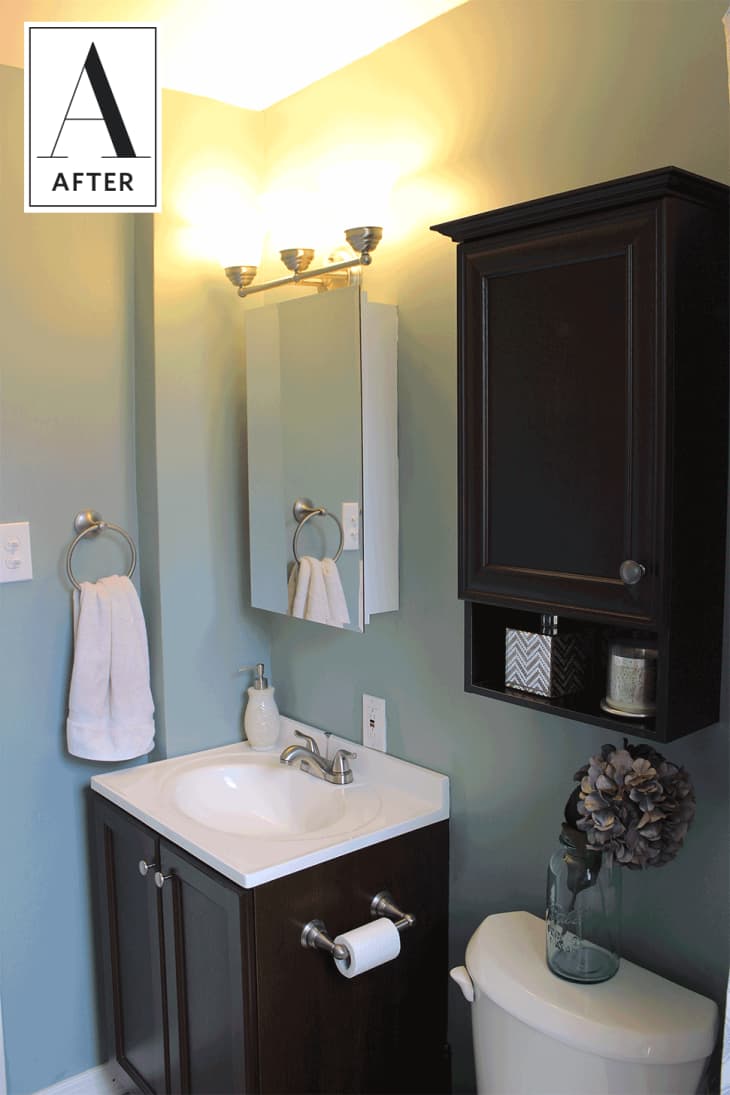
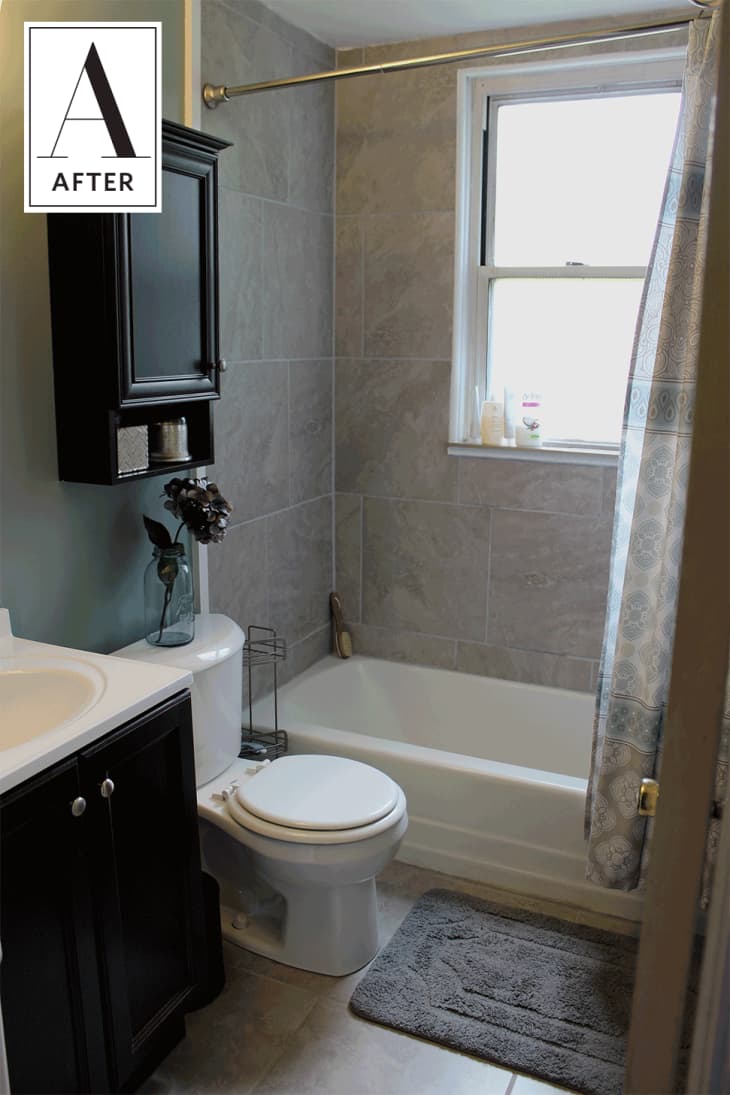
The only bathroom needed a complete overhaul. It was so outdated. Can you believe this place NEVER had a fan or ventilation of ANY KIND?! Gross. Water equals germs and mold. And there was a plywood ceiling and just a single dinky light. Therefore a full bathroom budget remodel was a necessity in this flip project.
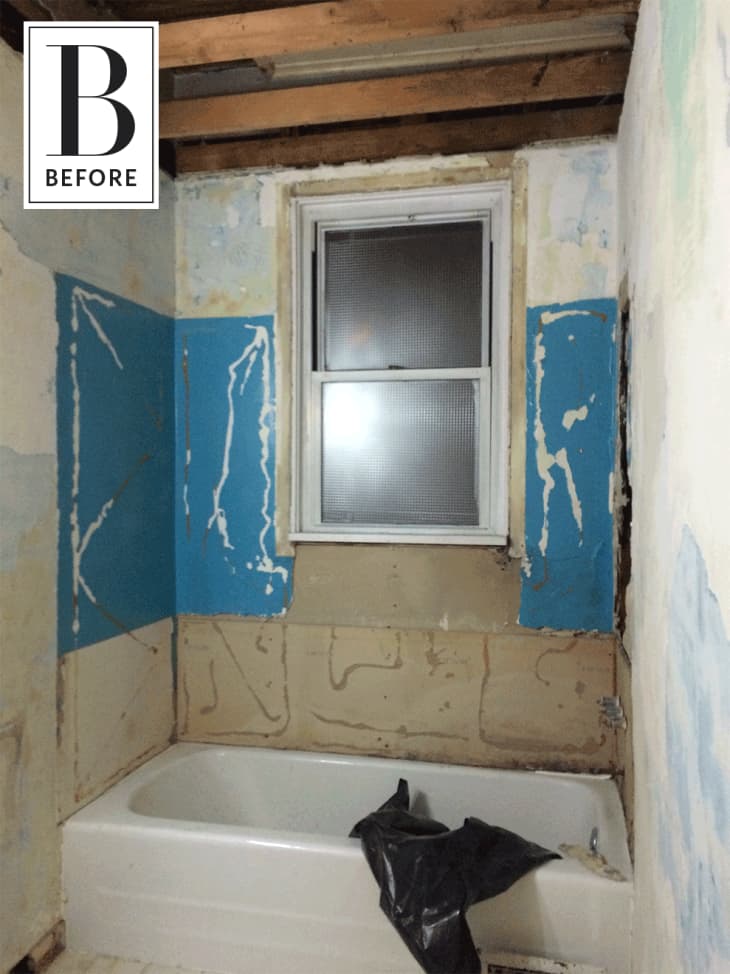
The plumbing, tiling, ceiling ventilation fan and fixture installation were all handled by professional contractors. A lot of work was done in a short amount of time, for an affordable price. The ceiling was replaced with sophisticated drywall actually suitable for bathrooms. The shower was tiled-in with new hardware and framing. The floor was tiled. The vanity was replaced and a new light fixture installed. A new toilet was a installed. And most importantly, a fan with proper ventilation to the exterior was installed. The rest was all DIY, and all design and material decisions were made by myself. The main work was scraping the horrible wall paper and glue off the walls and then repairing the walls in order to prime and paint.
We selected tile from The Home Depot. The BF’s requirement was that the tile had to be less than a dollar per square foot. My (more important) requirement was that it didn’t have a trace of brown, beige, orange or red. This was a big, stressful decision just because we had a lot going on all at the same time. We were both feeling the stress of the fact that this project was risky, uncharted territory for us – especially as a young couple. We settled on this oversized gray tile with a marbled stone look and polished finish. Gray tile was a safe, neutral choice for this rental, but also more modern and clean than a tile with a warmer undertone would be.
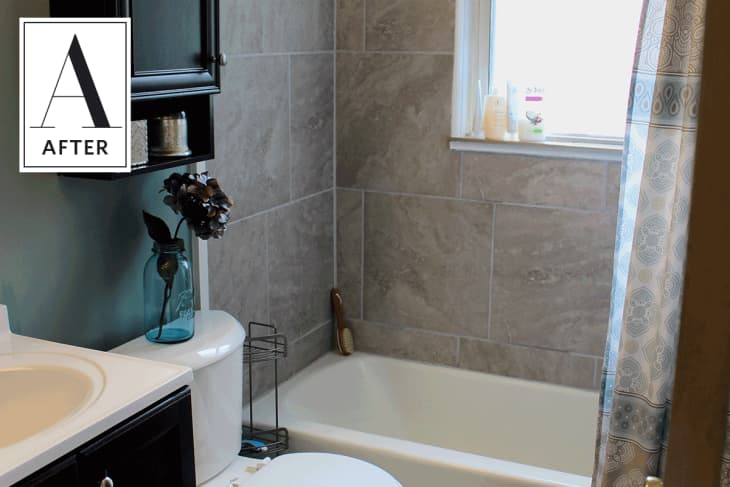
Selecting the grout was also an important choice. We went with a very light and creamy gray, not making too much of a statement with contrast. I wasn’t really a fan of the idea of using a stark white or dark grout, too much of a contrast for this type of generic apartment.
We did have one post-purchase meltdown. After all, the tile was a big investment of money for the materials and labor, plus it’s all over the bathroom and permanent. I don’t remember who had the thought, but suddenly someone was VERY upset that we had chosen the wrong tile. The meltdown included thoughts like: This tile won’t look good. Why did we choose such a BIG tile?! Did we even get a tile made for walls versus flooring? Can all tiles be placed vertically? What if its too big and heavy to lay vertically?
The freak out was real, panic ensued. I felt guilty and responsible since I had said I’d own the choice when we selected the tile. By the way, there’s little information out there online to help a frantic person figure out if any tile can be used on vertical and or horizontal surfaces. But it turns out, all’s well that ends well. The tiling looks AMAZING for the insanely low cost and effort. I personally love the huge, modern, sleek tiles for this rental.
The most physically trying DIY project of the entire flip was installing the bathroom storage cabinet. I was insistent on installing one as there is ZERO storage space in the entire apartment, and you always need storage in the bathroom, right? It was awful. Seriously, beware, you think this project is simple and straight forward, but it isn’t. Finding a stud proved to be impossible, so we had to use screws with anchors to secure it to the wall.
It was frightening the size of the hole we had to screw into our old and thin plaster walls to get the spring fasteners through. The mounting process calls for putting the screws first through the cabinet then through the hole in the wall, which left us blind to seeing what was going on during installation. This was combined with the struggle of trying to hold the heavy cabinet steady and in its level place. There was a LOT of shrill shrieking involved in the process. I thought the whole thing was going to come crashing down with half of the wall at one point. But we did it! It is still (knock on wood) hanging and serves exactly the function and purpose we need in the space.
With the neutral tile we selected, I wanted to have a little fun with the paint color. I picked Spruce Shade by PPG Paints from the Voice of Color palette. I seriously love the color. It is a fun color, but still a subtle and soft backdrop for such a small space. The neutral tile, white trim and natural light in the space really bring everything together.
Finding the perfect shower curtain from Home Goods by Cynthia Rowley enhances the color scheme. I incorporated a few pieces of silver mercury glass, a unique soap dispenser from Home Goods, and a vintage turquoise Ball mason jar for accessories.
Budget wise here is an estimated list of costs involved in flipping this tiny Pittsburgh bathroom: $2,765
- Contractor fees : $2,000
- Paint: $20
- Hardiebacker cement board: $50
- Tile and grout : $100
- Vanity: $139 – Glacier Bay package from the Home Depot included the cabinet, sink counter top, fixture and plumbing! Similar to this package
- Medicine Cabinet : $60 – extremely basic version from the Home Depot (I did NOT get to pick it)
- Toilet: $150 – middle of the range from the Home Depot
- Light – $65 – extremely basic version from the Home Depot
- Over the toilet storage cabinet – $79 from the Home Depot
- Toilet Roll Holder : $15
- Soap Dispenser: $12
- Shower Curtain: $25
- My sanity, free time (BF likes to spend HOURS making purchase decisions at the Home Depot) and labor: PRICELESS
I do wish there could have been room in the budget to select a vanity with a counter top other than generic white. The white shows dirt and hair easily, and is impossible to keep visually clean. This causes a lot of frustration for my BF and therefore I am constantly hearing about how he is unhappy with me because my hair “IS EVERYWHERE.” This is one of many joys of living in a very basic, TINY apartment with a significant other.
This is a very basic, straightforward, budget bathroom update. But it’s the journey we took together as a couple that is the story. We did it. That’s why we are so proud of this bathroom. It might not be grand, but hey for now, home is where the wine is!
Kristina’s words of wisdom: Tackling your first ever flip or renovation project as a 25 year old couple is hard. Make sure to have an open mind and agreement on the scope and costs of the project. Keep in mind what you need in the finished project, and use that to help you make decisions that fit in scope and budget. We knew we had limited space and budget, so we enhanced the tiny space filled with cheap materials with a beautiful paint color and fun shower curtain.
A good contractor is a must, ask around until you settle on a contractor that has that great word of mouth street cred. Motivate the contractor by saying you’re hoping this project turns out great because you’d love to work on future projects together and refer them to your network. Have a list of names of people wanting to see the work on your project, as they prepare to hire for their own. Direct referrals are a contractor’s golden ticket. Communicating proactively and clearly, plus having a paper trail of directions and decisions is a must to fall back on, in the case of anything going differently than planned. Breathe. It will all work out.
Thank you, Kristina! You can see more on Kristina’s blog, Moscato is My Mantra.