
A Whimsical Canopy Bed Hack Makes This Bedroom Look Straight Out of a Storybook
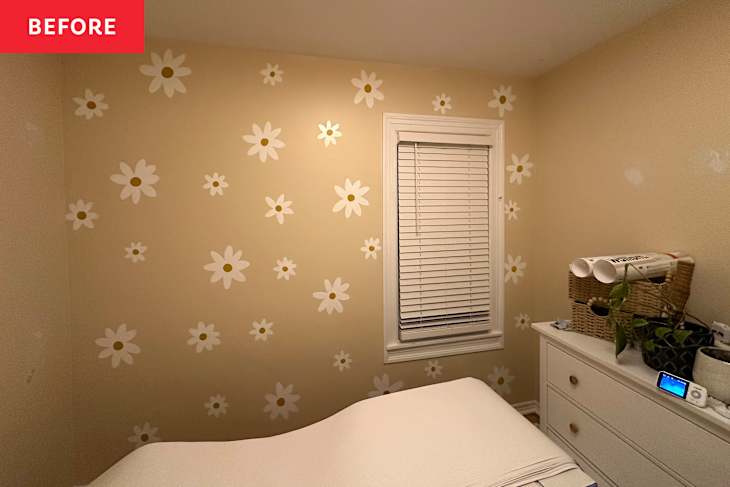
As a design writer for more than a decade, I know for sure that whimsy is the buzzword of the year for 2026. And that’s totally fine by me — I’m always looking for ways to add a little whimsy and unexpected charm to my home. Creating a whimsical, fairy-tale-inspired space was actually the main goal behind my most recent DIY bedroom transformation, and I think I pulled it off.
From a vintage-inspired wallpaper to a princess canopy hung above the bed to the vintage finds scattered throughout the whole room that tie everything together, I transformed my daughter’s bedroom from a nursery into a whimsical escape that can grow with her. Here’s how I tackled the project — plus, the finishing details that pulled the entire space together.

My Criteria for the Perfect Wallpaper in a Stylish Kid’s Bedroom
My daughter is in her princess-loving era right now. So I set out to transform her bedroom into a space that feels straight out of a fairytale. I wanted the room to feel timeless and elevated, too. This meant no cartoon princesses pasted on the walls or overly themed items she’ll grow out of in a few short years, a move about sustainability as much as it was about elevated aesthetics. I can’t stand the thought of buying a bunch of items only to completely replace them in a few months, for both the planet’s sake and my wallet.
I started with the walls. I’ve been dying to do a wallpaper project in my home for a while now, and this felt like the perfect opportunity. When deciding on wallpaper, I had a few requirements: It had to be pink (my daughter will have nothing else!), it needed to feel vintage-inspired, and I wanted it to feel whimsical but not too juvenile. I want the space to grow alongside her. I’m not looking to redo wallpaper anytime soon!


I Selected Wallism’s Gorgeous Candy-Striped Wallpaper
In the end, I went with the Erie Petite, Rose by Wallism, and I’m totally in love with it. Not only are the color and pattern exactly what I was looking for, but this brand’s self-installation instructions — they meticulously number each panel so there’s no guessing involved to make sure the pattern matches! — made it a breeze. I didn’t have a meltdown despite this being the very first time I’ve installed wallpaper on my own. Plus, they sell each pattern in three different formats: traditional, peel-and-stick, and premium textured. I just went with their traditional and used wallpaper glue from The Home Depot to hang it in the space.
Choosing a micro-striped pattern for a room in an old home where nothing is level and most of the walls are plaster was a bold choice on my part. In the end, though, the result looks seamless, and selecting a timeless (yet totally vintage-esque!) pattern will definitely evolve with her tastes as she grows older.

I Tried a New Twist on a Traditional Canopy Bed
The wallpaper was undoubtedly the biggest difference-maker in the space, but the small decor changes helped to create a whole new vibe as well. “Fairytale princess” was the goal. So I let my whimsical inner child loose and scoured thrift stores, antique markets, and Etsy for charming, classic pieces to pull the space together. Just a few items I selected include: a vintage brass unicorn figurine that sits proudly on the bedside table, a princess castle print from Etsy hanging in a gold frame, and a brass trivet that I repurposed as a plant stand. I grabbed a few pieces from Amazon and Homesense, including a rose-inspired table lamp (a rare score!) as well as the true star of the show, a billowy canopy.
This was the part of the project my daughter was most excited for, and honestly, I get it. These hanging canopies feel so nostalgic; I also had one as a kid and was equally obsessed. They add an effortlessly whimsical touch to any space and make bedtime feel extra magical. The positioning in the room, though, is what makes it feel extra special. Rather than positioning the feature directly above the head of the bed, I chose to off-center it in a cozy corner, where I also secured the edges of the canopy to the wall directly with ribbon (This prevents any potential tangling during fitful sleep, which is a safety move that I love!).

Why Kitty-Corner Canopy Beds Are the Ultimate Whimsical Bedroom Trend You Shouldn’t Skip
By flipping the positioning of this centuries-old decor staple, I inadvertently made the whole bedroom feel more open and inviting. I also carefully chose the canopy I installed, as its color and texture were distinct. Since the wallpaper features off-white tones, I went with a cream-colored canopy to keep the space feeling warm. I prefer to introduce layers of complex notes alongside the wall’s pattern, so going with a canopy with a bit of visual texture helps the design feel more balanced and cozy.
Kitty-cornering the canopy also created the illusion that this busy spot looks much bigger than it actually is; it’s a distinct, intentional area that I hope my daughter will use to read and relax in. Cornering a canopy can also help it feel even more cocoon-like than the regular position you may see in a full four-poster bed, as my setup doesn’t steal extra floor space while delivering a visual that’s totally breathtaking. All in all, I’m completely obsessed with this room transformation, and I’m shocked at how easy it was to tackle. A few intentional design choices pulled the entire space together, and reinventing the way I thought about a canopy bed has me wondering: Have we been placing them in the wrong spot all along?
Design Defined
Never miss the style inspo and recommendations you crave with Design Defined. Follow along each week as our Home Director Danielle shares the best style advice, latest trends, and popular decor finds you just can't miss.