
6 Tips for Applying Peel-and-Stick Backsplash Like a Pro
If you’re renovating your kitchen, you might be considering a peel-and-stick backsplash. Maybe you’re renting and want your deposit back. Maybe you’re working on a tight budget, or splurging on other parts of your reno and want to save on this one. Or maybe you like to change up your style frequently and want something with more flexibility than a tiled backsplash. They’re all good reasons for going the peel-and-stick route.
But just because this DIY doesn’t require grout or tile spacers doesn’t mean it’s foolproof. To get the skinny on how to make a peel-and-stick backsplash look like it was done by a pro, I chatted with three seasoned DIYers who have successfully installed backsplashes in their homes. Here, their tips (and their impressive results).
Don’t skip the prep.
Because your peel-and-stick tile will mount to the wall with adhesive, it’s important to prep your walls first — otherwise, leftover dust and kitchen grime can affect how well it stays up.
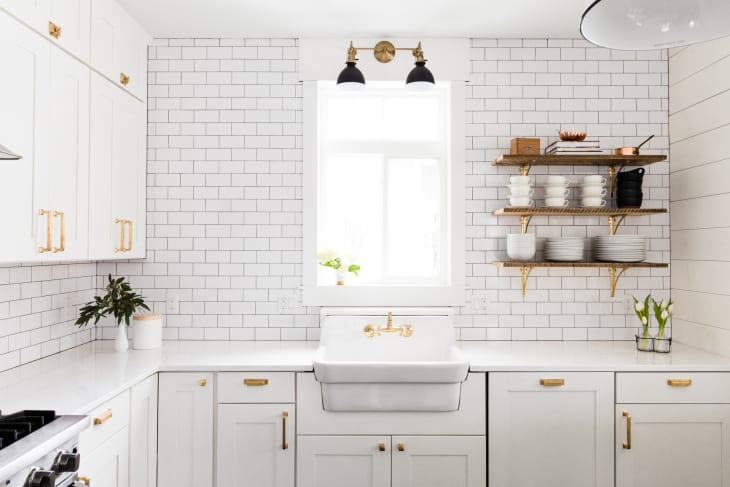
You should also do everything you can to make sure your walls are even, including removing any stray screws and filling (then sanding) any holes. “Do any repairs to the wall to make sure the space is even and clean,” says Brooke Cribbs of Cribbs Style, who achieved the results above in her kitchen with peel-and-stick glass tile from Aspect. “This will better ensure the tiles will stay put.”
Once you start sticking the tile up, tread lightly at first, Cribbs advises: “When applying the tiles, apply light pressure to make sure it’s in the correct spot before applying full pressure.”
Draw a guide line on the wall.
Whether you’re using thick stick-on tile sheets like Cribbs, or more wallpaper-like peel-and-stick tile, getting your pieces level is crucial to making your space look high-end.
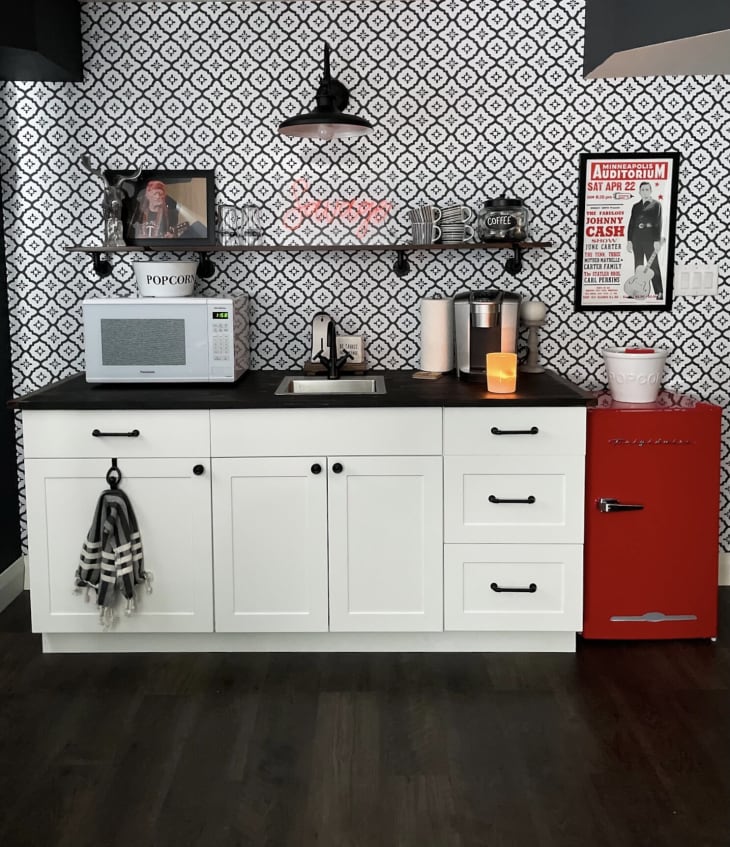
“We always draw a straight line on the wall to ensure our first piece is straight and level, even if your wall isn’t,” says Michele Savage of Our Uncluttered House, who DIYed the wet bar backsplash above using Wall Pops removable wallpaper. “This is the best piece of advice I can share,” Savage says. “If your first piece is out just a little, it’s all downhill from there… literally!”
Don’t panic over mistakes.
“When you’re installing a peel-and-stick backsplash, don’t be afraid to remove a strip and reposition it,” Savage says. “Use your hands to smooth out bubbles and ensure your pattern is matched before you use a smoother. Make that your very last step!”

Use a craft knife for precise cuts.
“Take the time to carefully cut with an X-acto knife when you get to edges and corners so you have the most professional looking finish possible,” recommends Amy Latta of Amy Latta Creations, who used a peel-and-stick backsplash from Home Depot in her kitchen.
Making these extra-precise cuts will also help your peel-and-stick look more like real-deal tile.
If you’re a renter, play it safe.
If you’re a renter and want to guarantee no absolutely no damage to your walls, try this hack: Apply your peel-and-stick backsplash to a plywood project panel, then use finish nails to mount the thin boards to your drywall. The holes will be small and easy to fill, and you won’t have to worry about lingering adhesive residue (or accidentally damaging drywall) on move-out day.
And finally, don’t worry about it holding up.
All three DIYers love how their backsplash has held up, thanks to their careful application process.
“The tile held up really well and we had no issues of any tiles cracking or slipping,” Cribbs says. “I love the way it looks and people can’t believe it’s peel-and-stick.”
Latta says hers has been up for almost a year and still looks new. “No peeling, no scratches, and it’s very easy to clean,” she says. “If you take your time and are careful, you’ll get a result that really looks like professionally installed tile.”