
This 1910 Bungalow Kitchen Finally Has Historic Charm After a Bad ’90s Reno
When designing a space that you share with others, especially your significant other, it’s sometimes hard to compromise on whose style is going to be reflected in the space. Even attempting to combine the design aesthetics into a space that reflects both of you can be a tricky task.
But for Jordan Gilbertson, the interior designer behind TJ’s Dwellings & Designs, and her husband Tony Bossard, the cabinet builder and general contractor of their Portland, Oregon-based business, this is exactly the type of challenge they love.
“We love working with people whose design styles vary slightly because it means bringing together two people’s visions and creating something uniquely theirs,” Jordan says.
After Living with the “Poorly Done” Renovation, It Was Time to Add Character and Historic Charm Back to the Kitchen
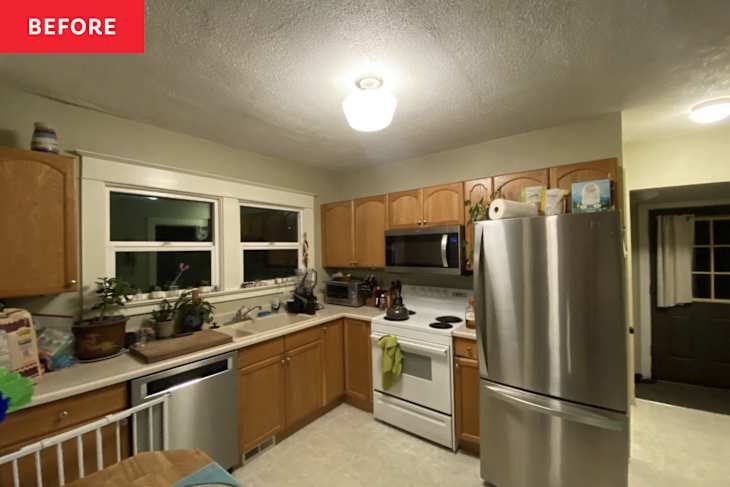
The clients’ 1910 Bungalow kitchen (in the same home that previously got a historic bathroom transformation) had “received a poorly done renovation in the early ’90s.” It called for a full renovation that would “find common ground between traditional, eclectic, and industrial, while not losing sight of the historic charm of an Arts & Crafts bungalow,” Jordan explains.
But first, Jordan and Tony had to fix the water-damaged ceiling. Because the home was over 100 years old, the ceiling was made out of lath and plaster — which meant repairing it was extremely difficult and time-consuming. They had their drywall team help scrape the layers back and gently remove the damaged areas so that they could rebuild it correctly to prevent future leaks or issues.


They Fixed the Layout with Custom Cabinets That Added Character and Extra Storage
Once the ceiling repairs were completely set and dried, Jordan and Tony tackled the poorly planned, “cheap and failing” cabinetry from the previous renovation. The layout wasted usable square footage, forced the appliances to be too close together, and didn’t allow for sufficient storage or counterspace.
But because Tony is a woodworker specializing in cabinetry, he builds custom wood details for many of TJ’s Dwellings & Designs’ renovations. In this case, Tony built new cabinets featuring soft-close drawers, hinges, and adjustable shelves. The couple also changed the cabinetry layout while they were replacing them.
“While we didn’t change the footprint of the kitchen, we did reposition the fridge to a corner of the kitchen that was unused and created a beautiful floor-to-ceiling pantry cabinet next to it,” Jordan says.
The custom flat-panel lower cabinets and floor-to-ceiling pantry were built from walnut-veneered plywood with handmade 10-inch solid walnut hardware, and the traditional Shaker upper cabinets were built with beech wood and painted with Vista Paint’s “Venetian Wall.” Jordan paired the upper cabinets with vintage brass hardware they had sourced from a local Portland store.
These changes made the kitchen feel bigger because more people could be in the space without feeling crowded. Plus, the new layout helped with overall flow and “created necessary spacing between each of the kitchen’s zones — cleaning, preparing, cooking, and serving,” Jordan adds.


The Kitchen Had No Bungalow Charm Before They Added Modern Fixtures with Subtle Vintage Details
Even though Jordan and Tony had fixed the kitchen’s functionality, the 1910 bungalow’s kitchen still lacked character. Their clients wanted to pay homage to the home’s history, but still have a modern space that fit their needs.
“The design was focused on being era-appropriate but not dated, rich in color but cohesive with the rest of the home,” Jordan says.
Jordan and Tony decided to add Moss Verde Matte Porcelain Tile and chose a matching paint color for the millwork (Vista Paint’s “Shagbark Olive”). “We strategically chose to do the walls white and use color on the millwork so that it was the star of the show,” Jordan explains.
Then, they added a gold-veined quartz countertop, custom range hood, new stainless steel appliances, custom maple open shelving, and Creta Chamotte Porcelain Floor Tile “that gives the feel and appearance of natural clay terracotta.”
Each of the new upgrades added the modern edge the homeowners were looking for, while still adding character to the kitchen.


The Kitchen Is Now a “Hosting Haven” That Combines the Clients’ Design Styles While Keeping It Timeless
Jordan and Tony also needed to figure out a way to increase the light in the space without changing the position of the ceiling light to avoid adding additional circuits. They found a solid brass fixture that has three extended arms that solved the issue, and added two pendant lights above the peninsula’s dining area. The accent lights, which they upcycled from antique chandelier copper shades with scalloped edges, paired perfectly with the reclaimed lumber barstools.
The couple worked together to create a space “that felt a bit funky but still timeless.” They sourced reclaimed materials for finishes and hardware, adding historic charm and a vintage touch to honor the original 1910 home.
They also restored all of the original millwork before painting, and even replaced specific areas that had been removed during the first renovation.
“The goal for the kitchen, albeit small, was to create a hosting haven,” Jordan shares. “We needed to create space for multiple people to function in the kitchen at the same time.”
Inspired? Submit your own project here.


