
14 Brilliant IKEA IVAR Hacks You Can Use in Every Room of Your Home
IKEA carries tons of totally hackable products, from the tried-and-true BILLY bookcase to cheaper items like the $10 LACK side table. But IKEA’s IVAR system, with its open shelving and closed-door cabinet options, is, by design, modular and customizable — which makes it particularly fun to see all the ways it gets wrangled and reshaped by its buyers.
It turns out there’s a use for an IVAR in pretty much every room in the home! Skeptical? Take a look at these 14 inspiring IVAR projects in real homes — and then start dreaming up your next hack.
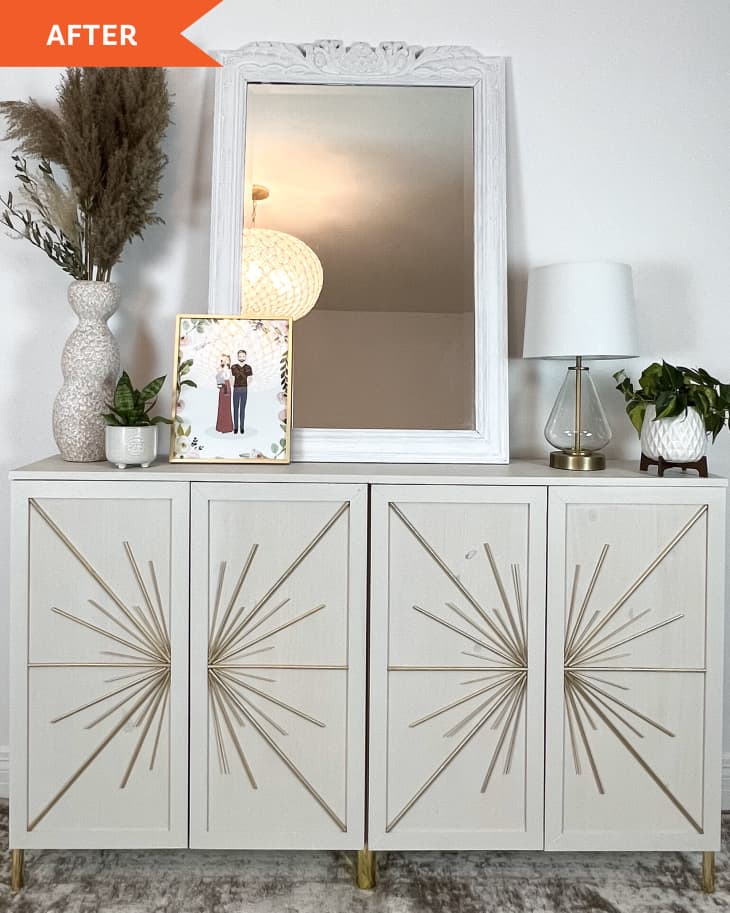
1. Add art deco details.
You can use trim pieces and dowels to upgrade an IKEA IVAR cabinet front, like DIYer Alana Gennara did. She added a countertop across two IVAR cabinets to make one large four-door piece, added Shaker-style trim, painted everything in Valspar’s Warm Putty, and then added spray-painted gold dowels in varying lengths for a sunburst look.
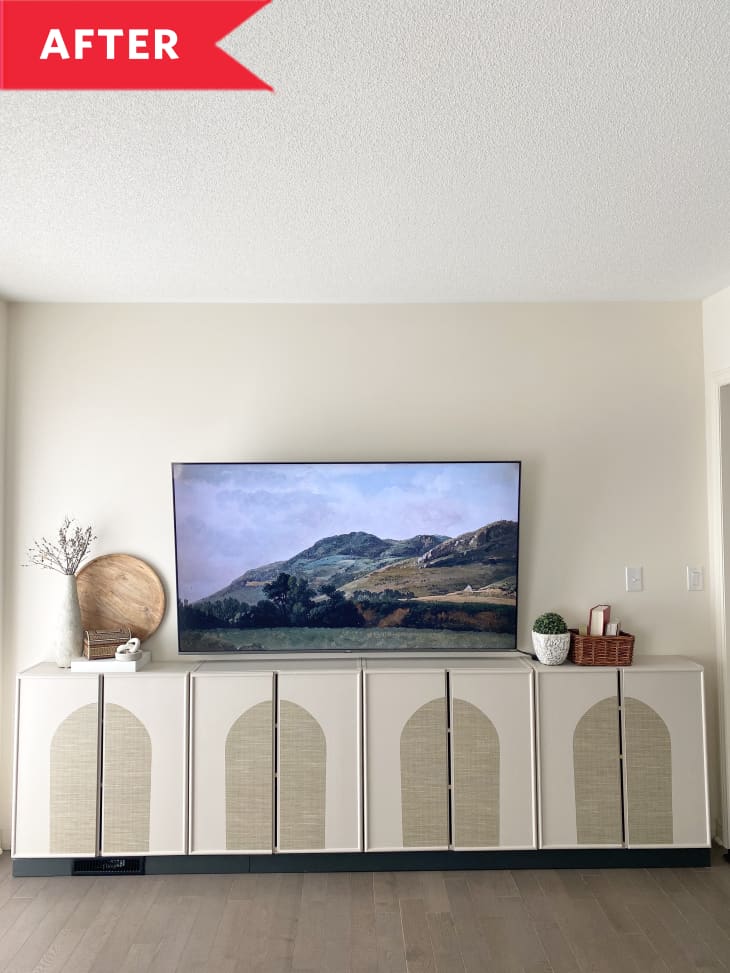
2. Add new (faux) texture.
Although the front of this media console made of IKEA IVARs looks like it would have a woven texture if you ran your hand across the cabinet fronts, it’s actually peel-and-stick wallpaper. DIYer Momina Zahid (@momina.zee) used a construction paper stencil to cut out wallpaper arches for more visual interest.
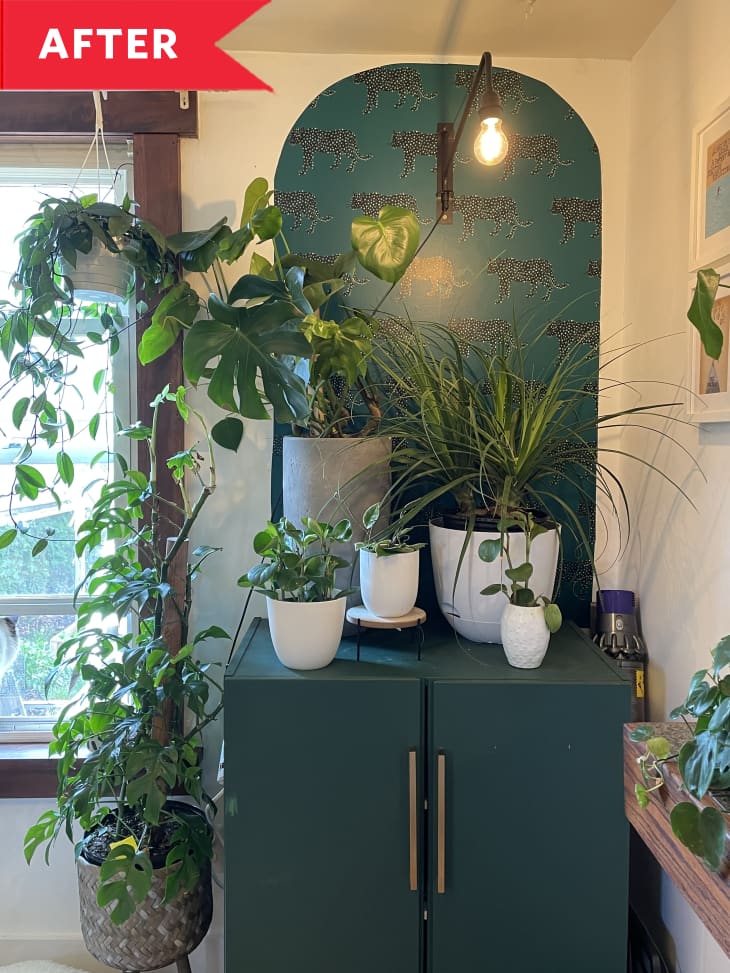
3. Give it a built-in look.
This IKEA IVAR hack by renter Kelly Malone (@kellymalonemakes) triples down on the green thanks to paint, peel-and-stick wallpaper, and of course, plants. Painting the IVAR to match the wallpaper behind it makes the whole assembly look built-in. One of Kelly’s favorite parts of her project is the lighting, “for drama and also for my plants,” she says. As for the IVAR, she says: “They are my favorite IKEA product and in a simple, nicely made pine — real wood — no MDF here … You really can do a lot with these, from wallpaper to paint or staining.”
4. Turn it into a breezy room divider.
Studio apartments or other open floor plans can benefit from a little division, which helps make areas cozier and less cavernous. Here, the IVAR shelf becomes a functional “wall” that still lets enough light through to the rest of the eclectic loft space.

5. Give it tiny pops of color.
IVAR shelving is, of course, a super practical and affordable storage spot. What makes this setup at Joy Cho’s studio special? The hints of color used on just the edges of the shelves, which provides the teeniest bit of color against the natural wood.

6. Add fluted wood details.
Trendy fluted wood decor is totally DIYable — and there’s no better base for the trend than the flat-front IVAR cabinet. Here, DIYer Becca added brass pin legs to give the cabinet a little lift, and used individual pine half-round molding to make the fluted pattern on its doors. A sweet pink color makes it look super delicate; for a moodier take, you could paint the results black instead.
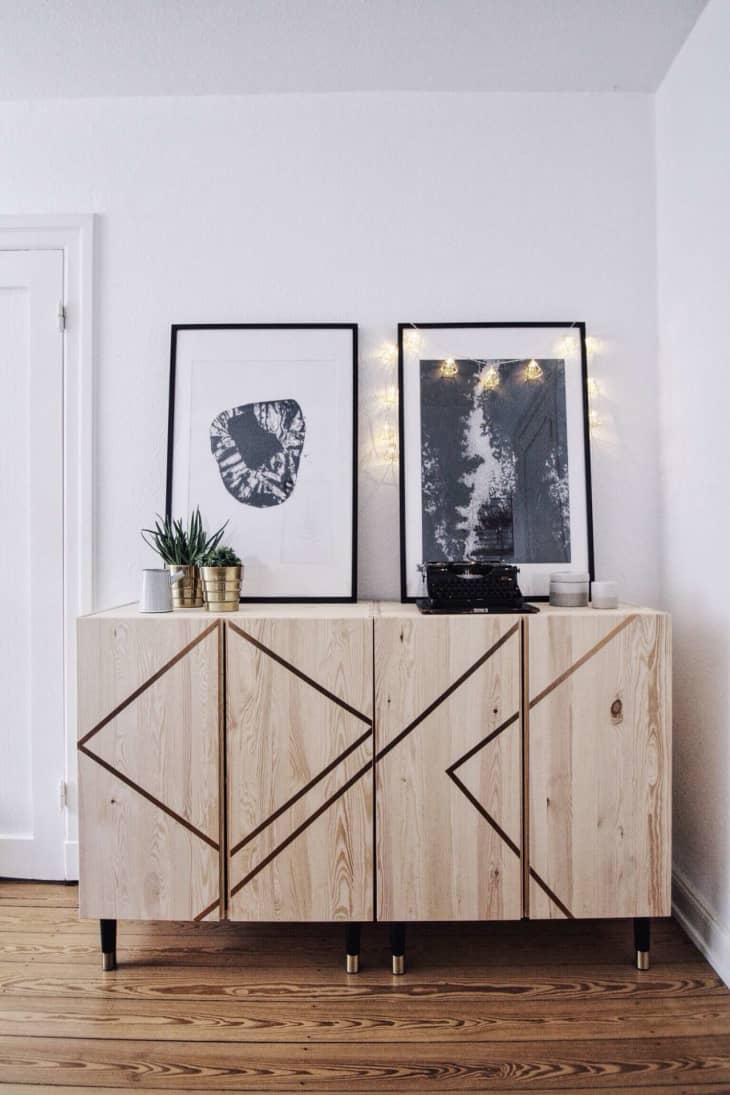
7. Make a mimalist geometric design.
The cool geometric design on the doors of these IVAR cabinets? It’s made with metallic bronze tape! (That’s right, there’s no paint cleanup neccessary at all in this one!) Setting the cabinets together and making a design that spans both makes them look like a singular unit. The DIYer, Anna-Vera, also added legs with a gold cap — the perfect metallic complement.

8. Create a swanky home bar.
These IKEA IVARs look meant-to-be in the niche in homeowner Susan Kunish’s dining room. She painted the IVARs and the walls the same navy shade (Behr’s Starless Night) and added a light wood countertop and matching shelves. The metallic feet from Amazon and the brass cabinet pulls give the setup a bespoke boutique look.
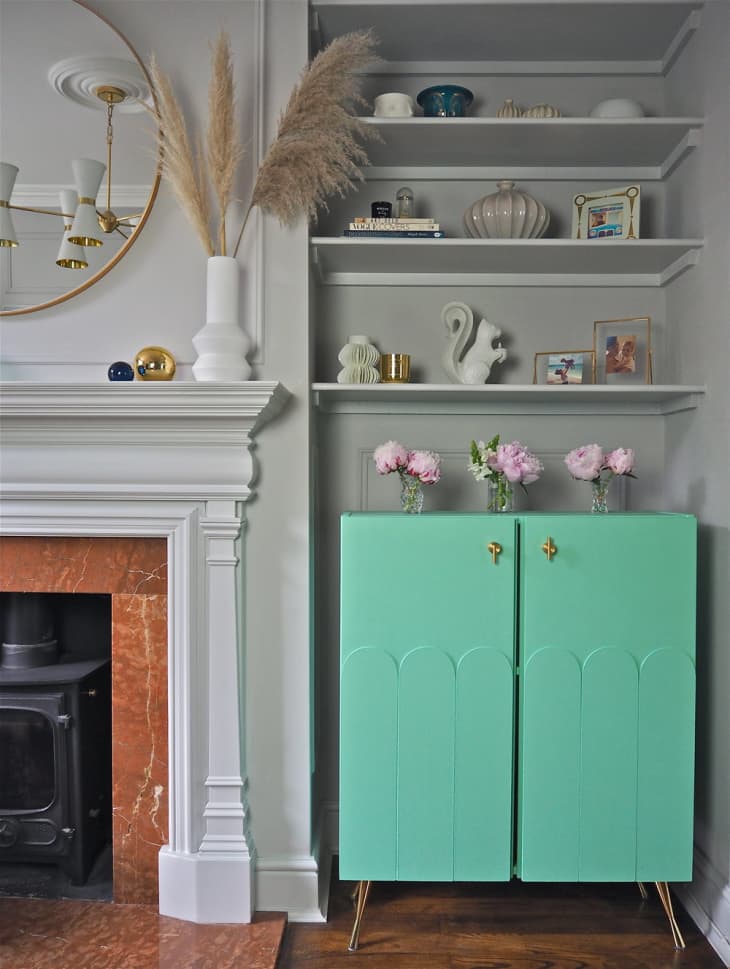
9. Craft a bar cabinet.
Interior designer Melanie affixed curved pieces of MDF to the doors of this IVAR cabinet before painting it a vintage-inspired mint green. Then, she added glam gold knobs and legs, plus racks for glassware inside — the perfect finishing touch for this cheery bar cabinet that takes up minimal square footage.
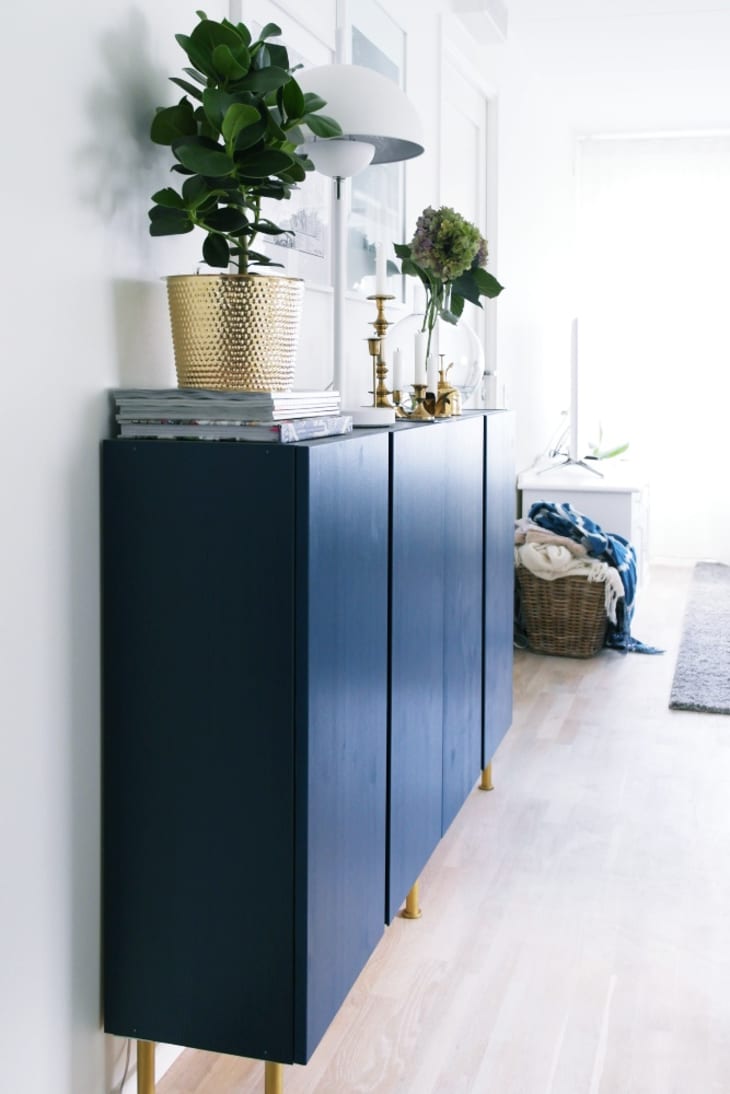
10. Hack a dining room credenza.
Two IVAR cabinets side by side are the exact right size for a dining room credenza. DIYer Catarina made hers by painting her cabinets deep blue and adding gold legs. The result is an affordable credenza that also offers tons of storage.
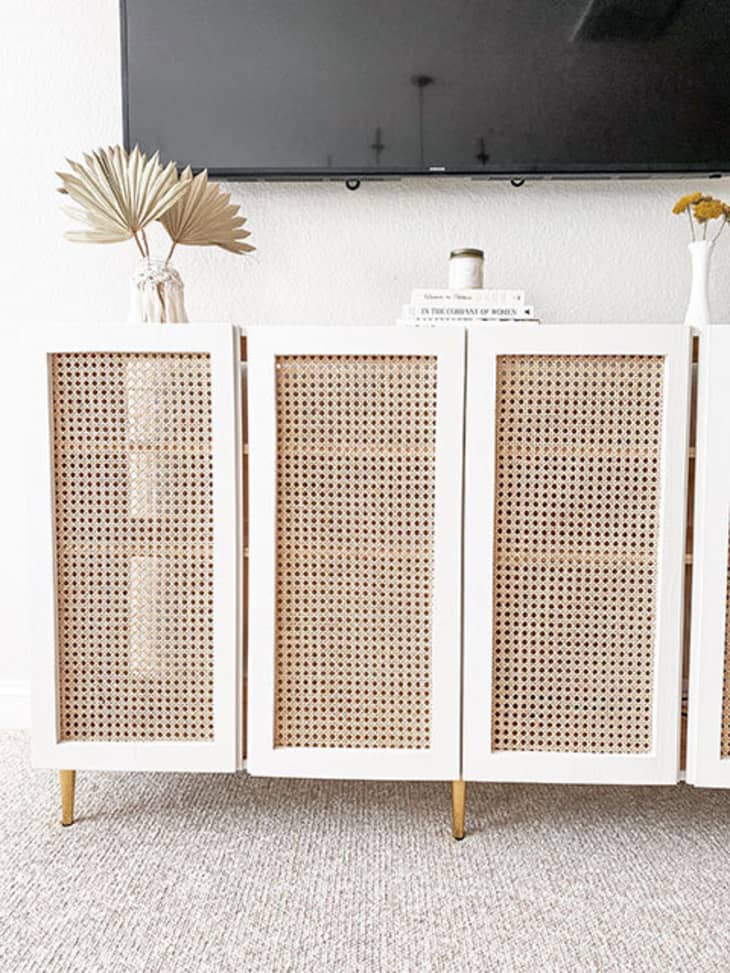
11. Install cane webbing on the doors.
The caned decor obsession is still going strong, but off-the-shelf pieces can be pricey. Blogger Megan Bell got the look for less by installing cane webbing in the doors of her IVAR cabinets. Painting the frame white and adding gold legs makes the look totally fresh.
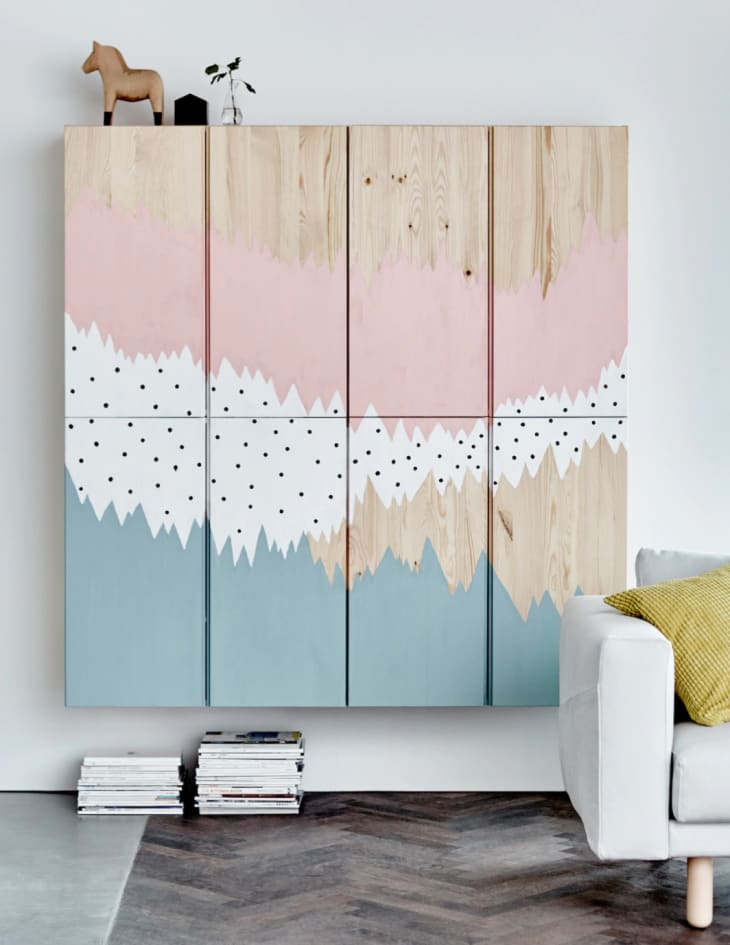
12. Turn the cabinets into wall art.
Try painting a mural over IVAR cabinets for storage that doubles as art. Even better? Mount the cabinets directly on the wall for a look that saves on floor space.
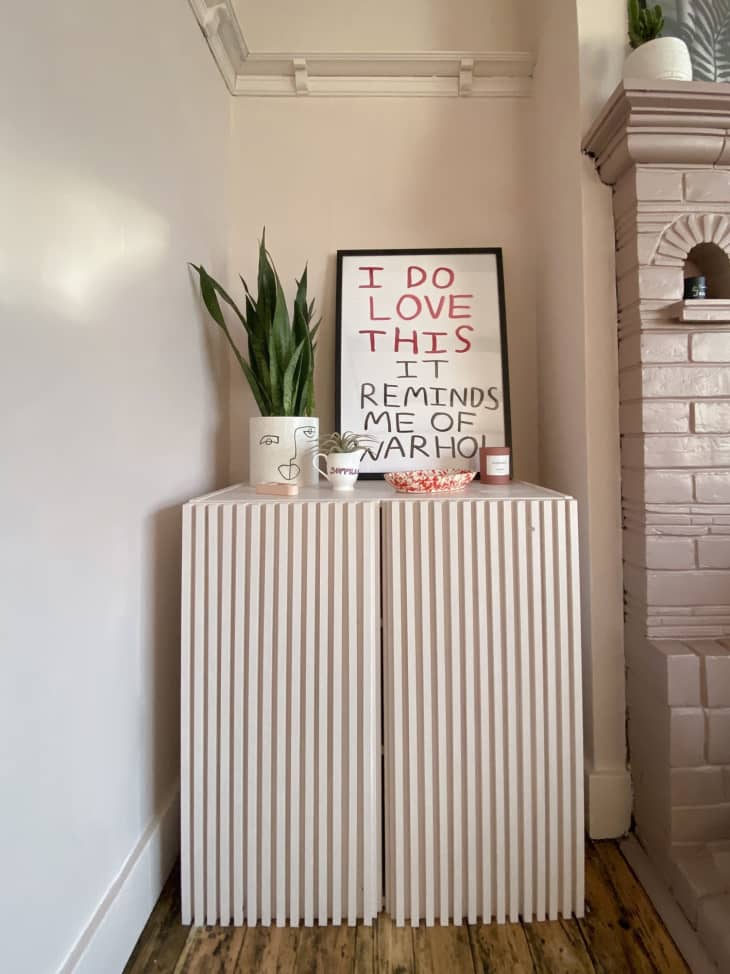
13. Give cabinet fronts a ribbed look.
Call this ribbed style the edgier cousin of fluted wood. It works great for adding texture to IVAR cabinet fronts for a look that’s minimalist with a twist. Here, Emma gave her IVAR cabinet an on-trend ribbed look using strip wood. She left it unstained for a natural look; you could also stain or paint it a color for a bolder style.
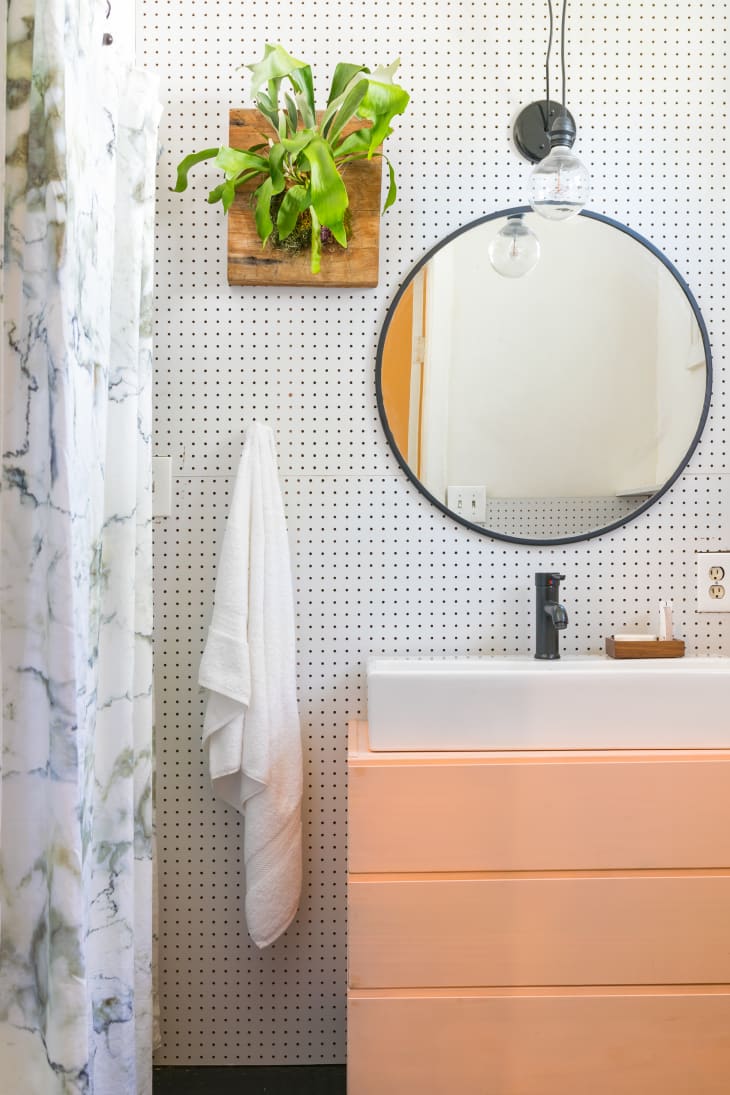
14. Turn the IVAR cabinet into a vanity.
This $500 bathroom makeover includes a vanity made by hacking an IVAR cabinet. With some cuts made for plumbing, a sink on top, and a new coral color, the cabinet is totally unrecognizable.
Get all the IKEA UPDATES
Sign up for The IKEA Edit, our twice-weekly newsletter with the latest IKEA finds, deals, and hacks.