
50 Clever Wall Decor Ideas to Revamp Your Space
Sometimes a blank wall can add visual balance to a busy room; and sometimes a blank wall is a decor missed opportunity. After all, a bare wall can serve as a the perfect canvas for telling your life stories, revealing something about who you are through wall art.
So how do you get started filling that canvas? Even with the best neutral or white paint colors, a blank wall can be intimidating. Thankfully, there’s no shortage of wall decor ideas from people who have handily solved this decorating challenge. An open mind helps. Remember, while posters, pictures, and artwork are great options, wall decor can go far beyond your basic gallery wall.
You don’t have to limit yourself to store-bought pieces, either. You can utilize textured fabric wall hangings or even paint on your own accent wall mural and skip hanging things altogether. The following wall decor ideas will help you take your boring, bare walls and turn them into statement-making accents in your living room, above your bed, and more.
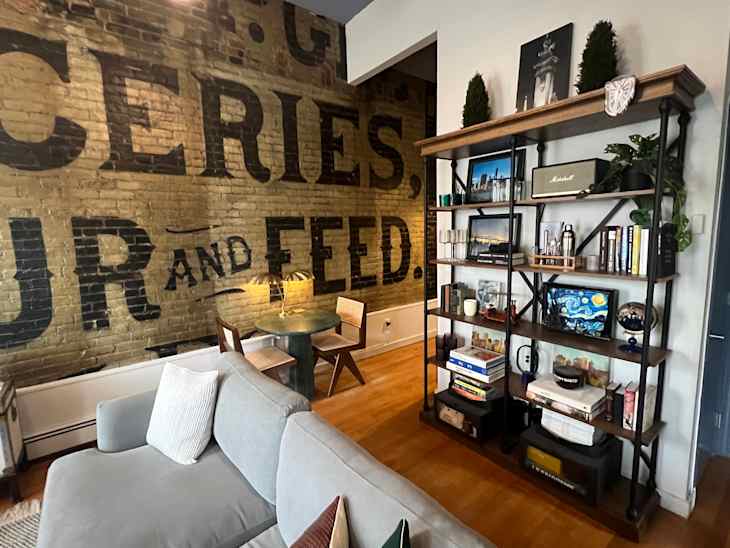
1. Use your words.
This New York apartment comes with an old advertisement for a market in the area already hand painted on a brick wall. While you can’t get the same, there’s nothing stopping you from painting your own favorite quote or words onto a wall — or an advertisement!
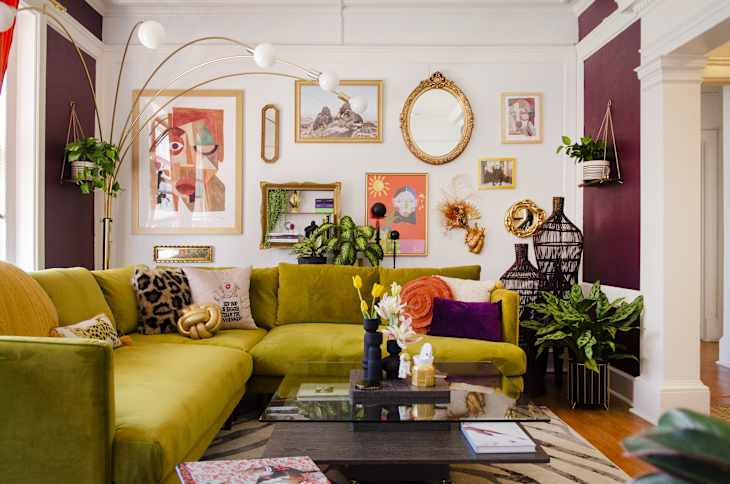
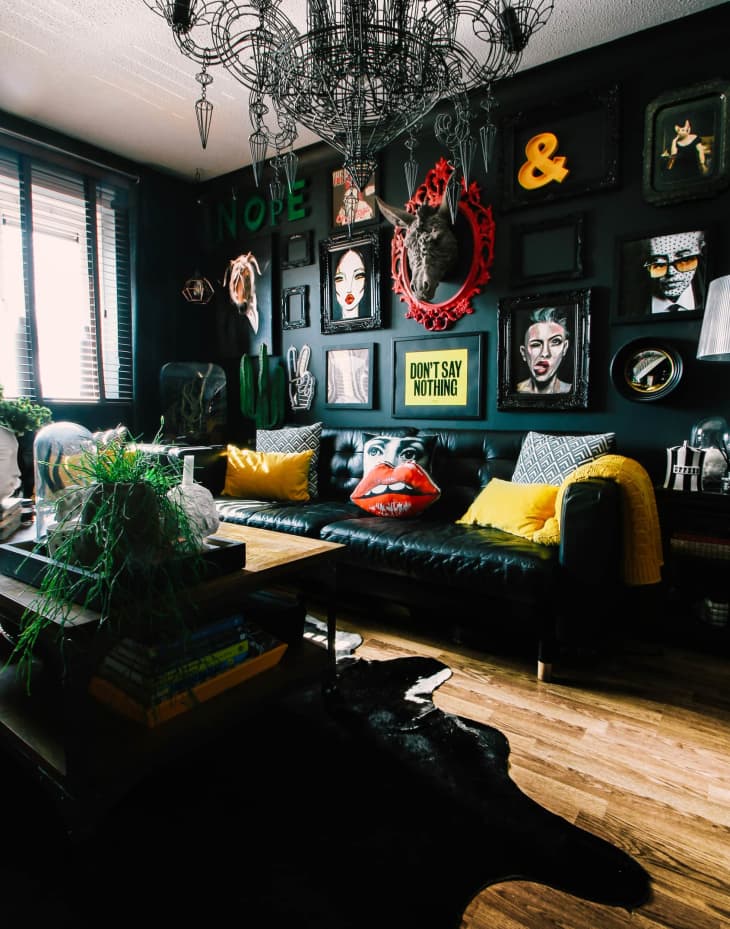
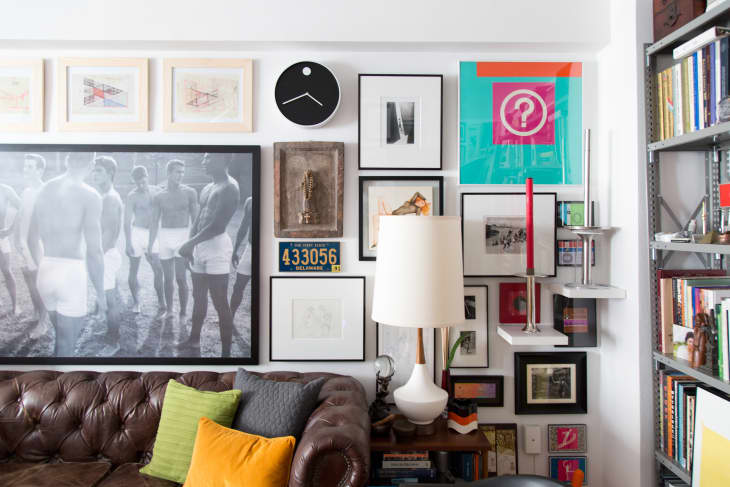
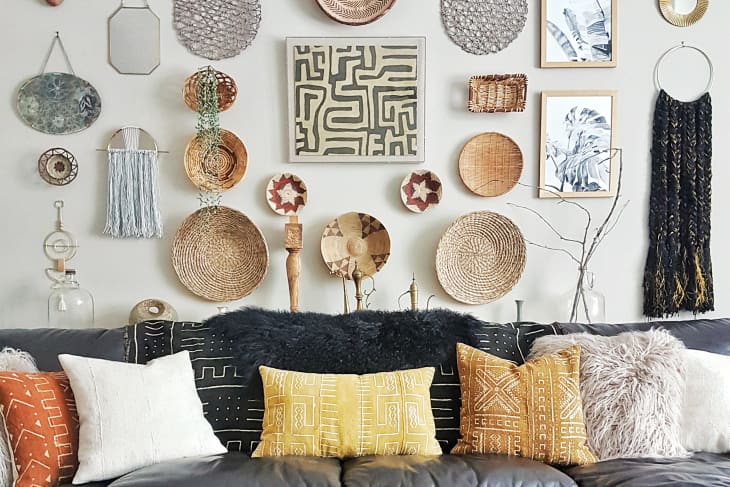
2. Go all out.
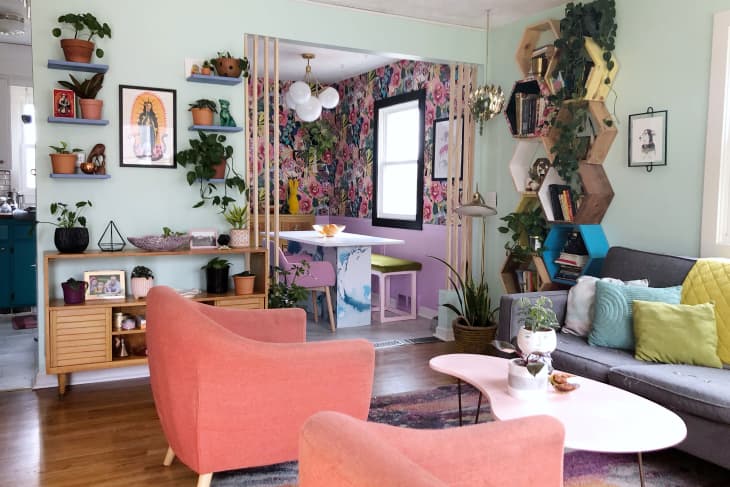
This Philadelphia apartment features over 200 pieces of colorful art (and other adornments) on its walls. Want to turn every inch of available wall space into a gallery wall? Go ahead!

3. Frame things other than art.
You don’t have to save picture frames for just art. This Houston apartment features framed knick knacks, frames within frames, and even an empty frame!
Loving these suggestions? Design Defined is our insider’s look into the latest style and decor trends — sign up now.

4. Work with door and window frames.
This LA studio has books stacked all the way around the door frame, using wall decor to create a beautiful framing piece. Don’t have enough books? You can achieve the same effect by painting a framing border or using other decor.
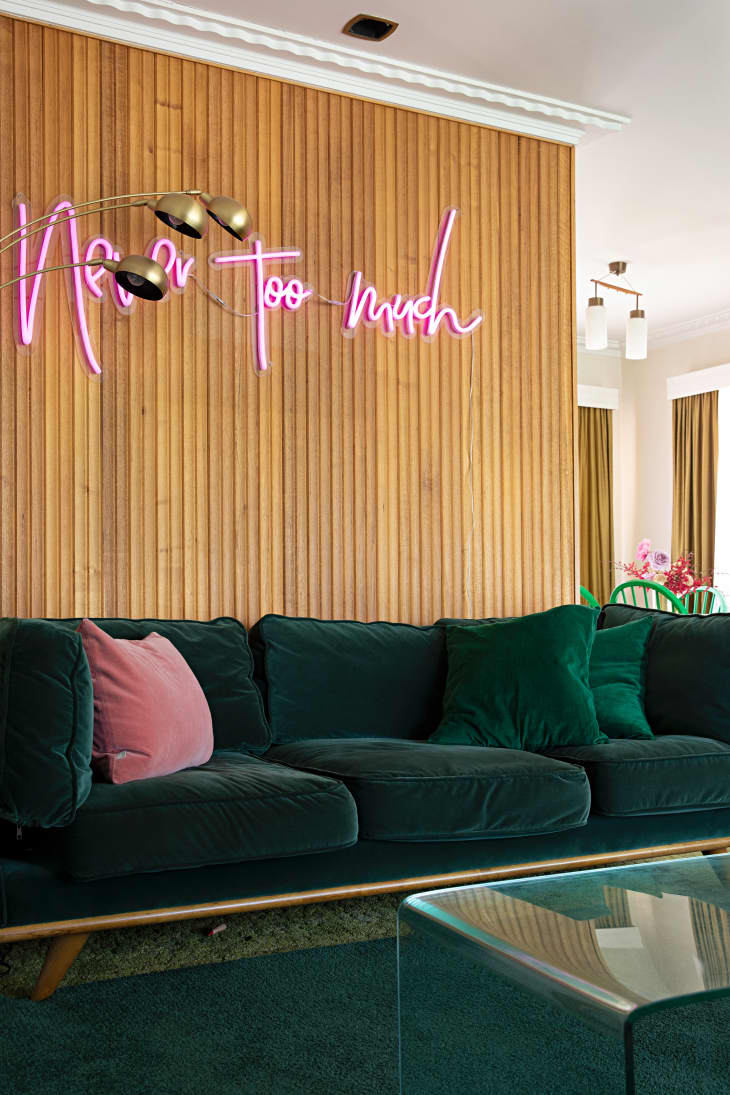
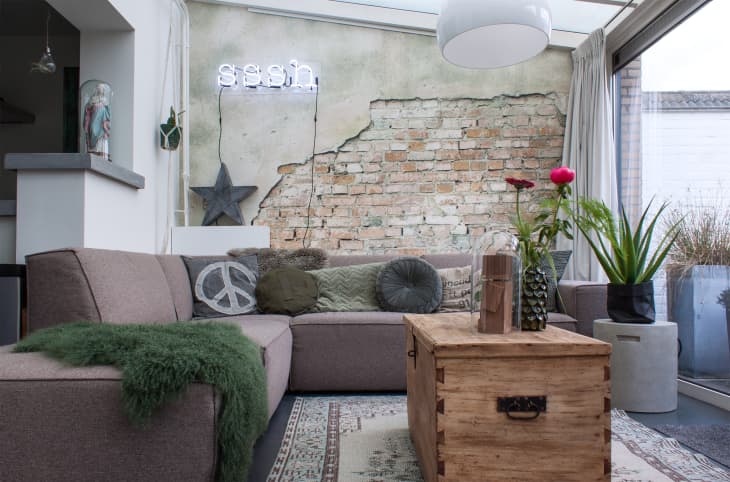
5. Go neon.
While neon signs can sometimes run pricy, they’re definitely eye-catching, as seen in this Melbourne home.
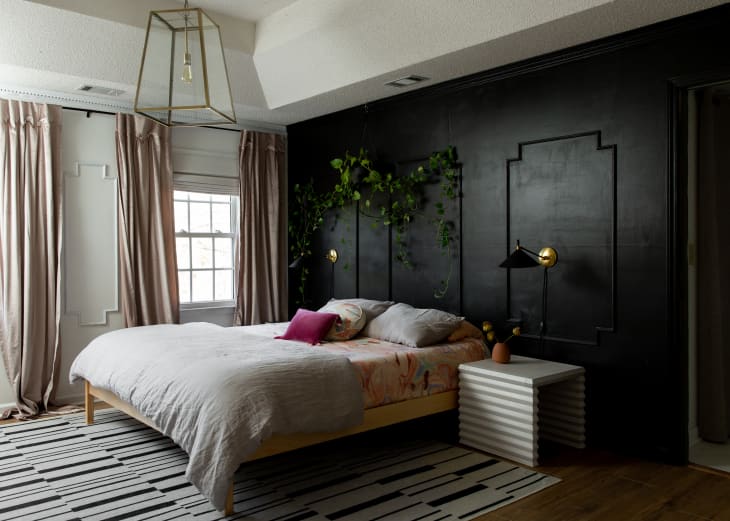
6. Add decorative wall paneling.
Sleek and minimal, wall paneling can add a decorative touch to any room. In this Georgia home, chic wall panels behind the bed take the place of a headboard.
7. Paint an accent wall.
Accent walls can make your space look bold and unique with one wash of paint. Pairing the accent wall with a cute wall hanging, like the one in this California house, doesn’t hurt.

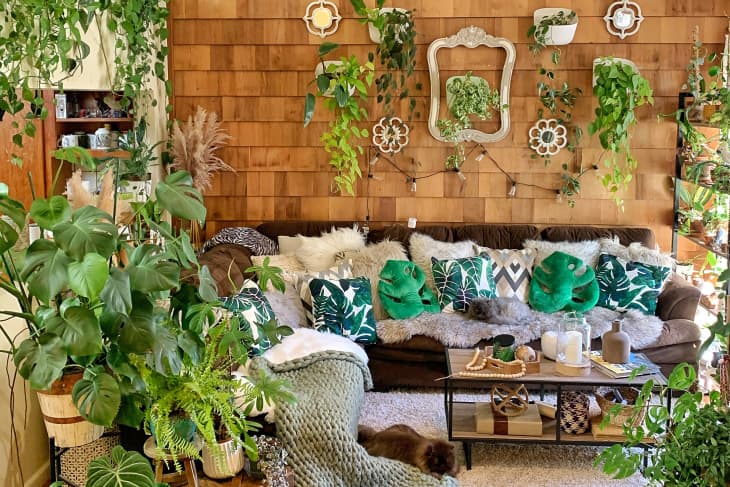
8. Go green.
Give your space natural verdant accents with a DIY greenery wall. Not only are greenery walls unique wall art ideas, but they also make your home feel grounded and soothing.
9. Opt for oversized art.
Hanging a fun oversized art piece is the perfect way to pull a room together, especially an eclectic room with a variety of decor and furniture pieces. The large palm tree print in this boho Florida rental is a great example, drawing your eye to the art and allowing the “swamp-chic” accent pieces to shine.
10. Add unique shelving.
The unique shelving in this North Carolina rental is whimsical, colorful, and full of personality. We especially love the books arranged by color!
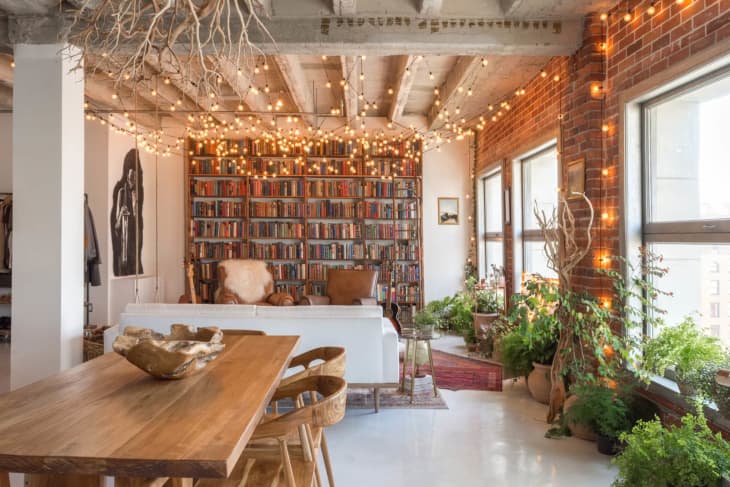
11. String up some lights.
Whether or not you opt to include art of any kind on your walls, you can always level up the sparkle with a few strands of string lights like you see in this pretty LA loft.
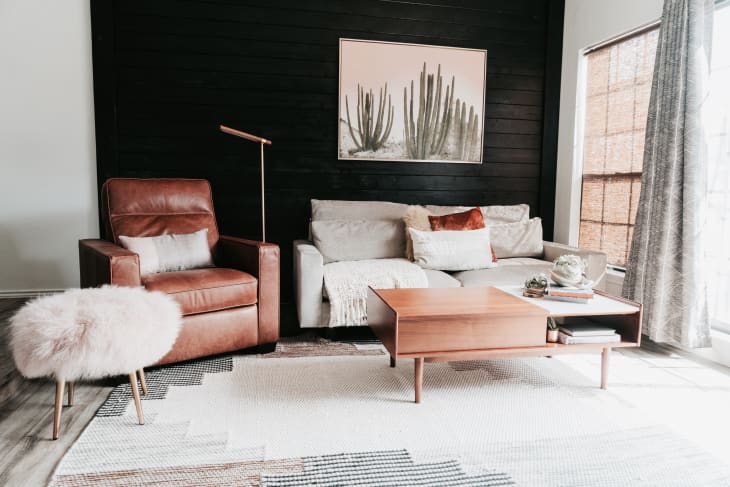
12. Go big with minimalist art.
Sometimes, less is more. That’s what we love about this Scandi-inspired Texas living room, which features just one oversized piece of art that pops against a black background.
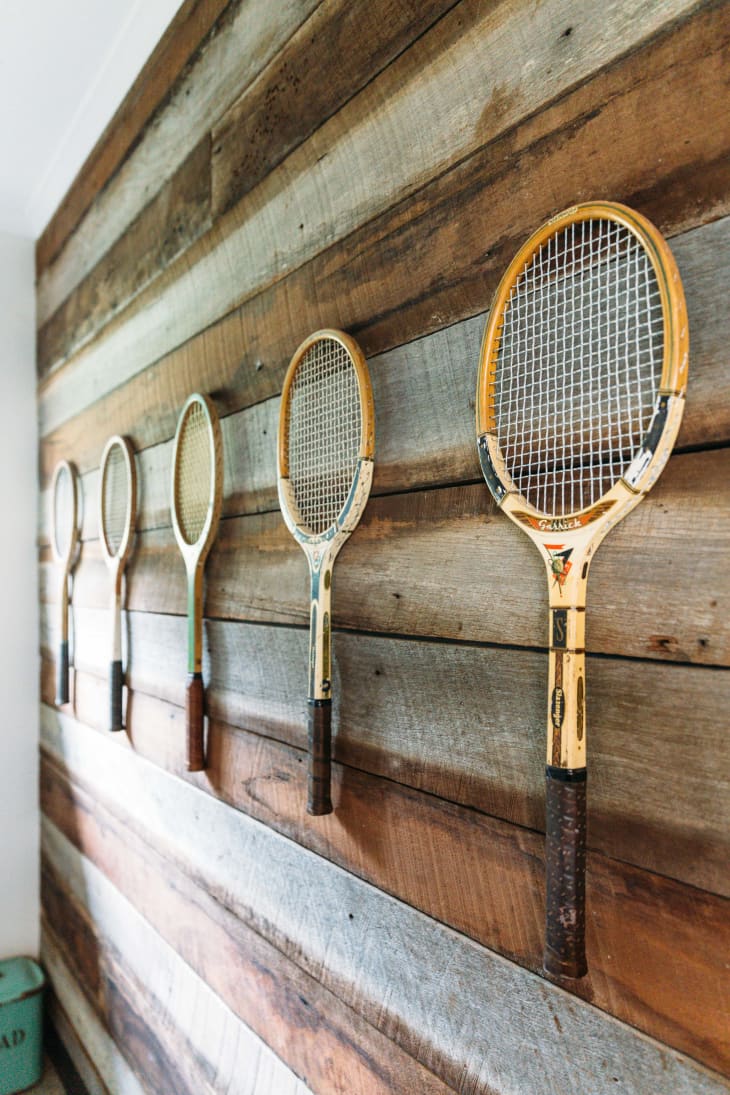
13. Hang up your favorite sporting equipment.
The powder room in this Australian home manages to look both funky and upscale at the same time, incorporating vintage tennis rackets hung in a row on the wall.
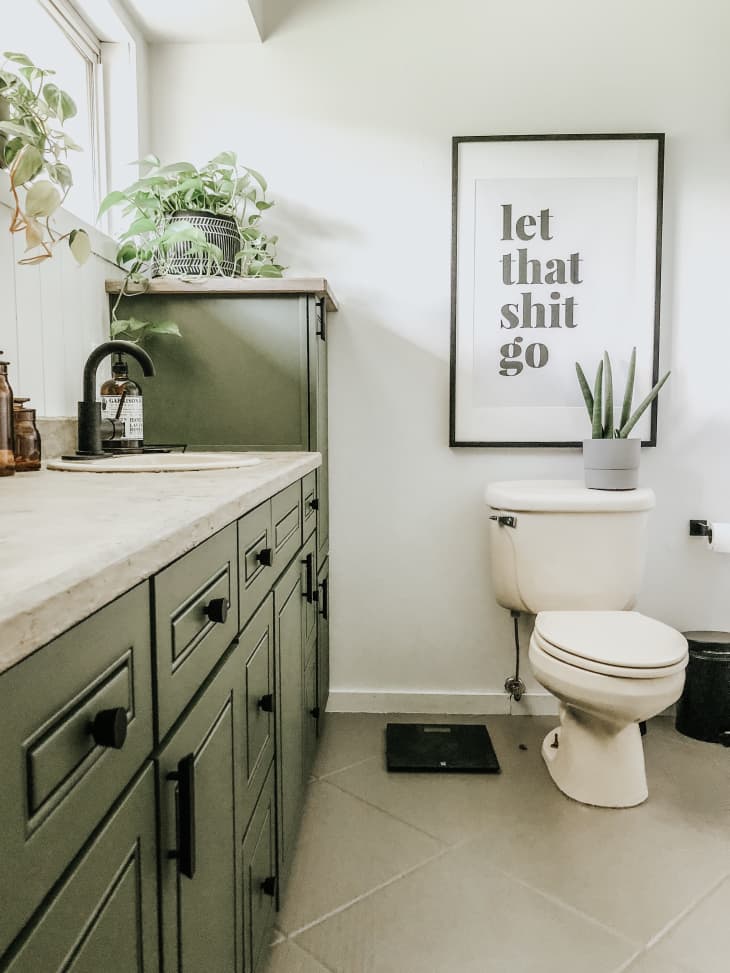
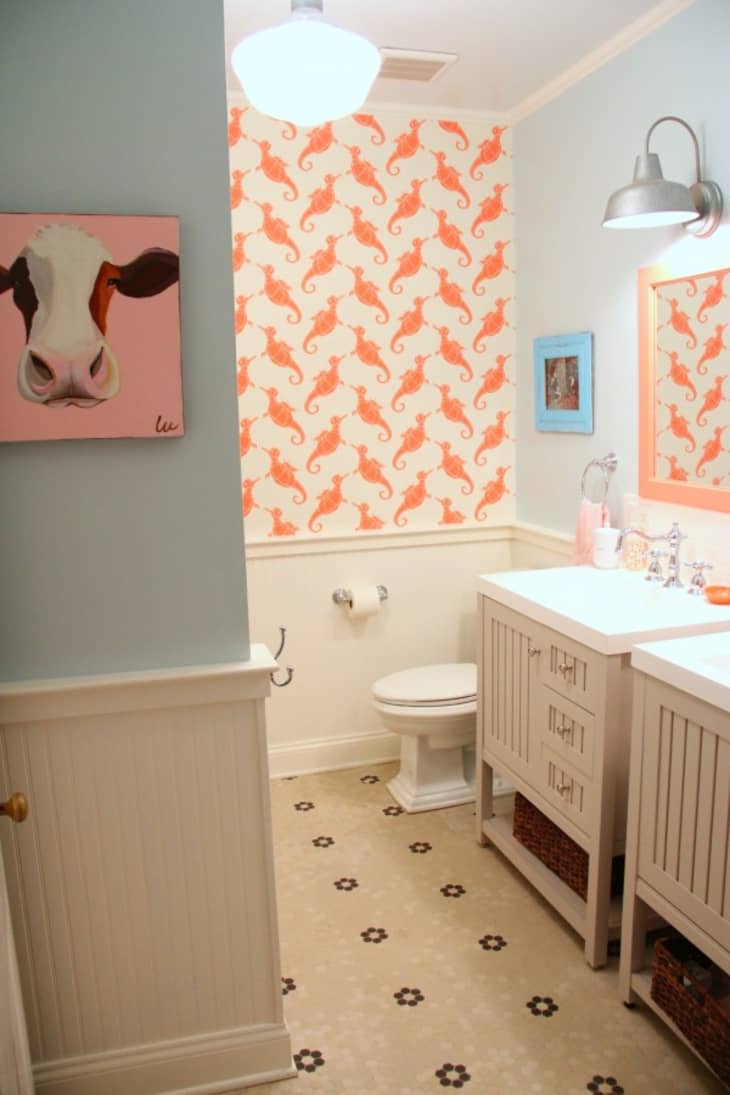
14. Use room-specific art.
You don’t have to choose art that’s quite as tongue-in-cheek as this Ohio bathroom, but art that speaks to the particular room it’s hung in is always a fun option for wall decor.
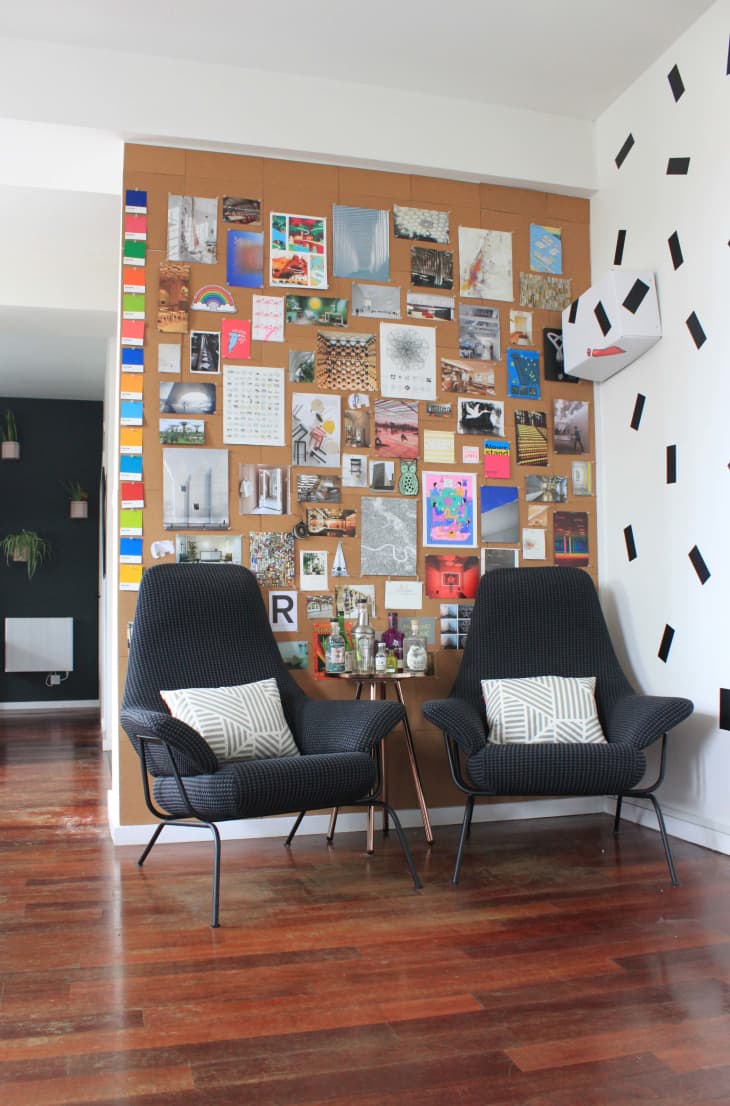
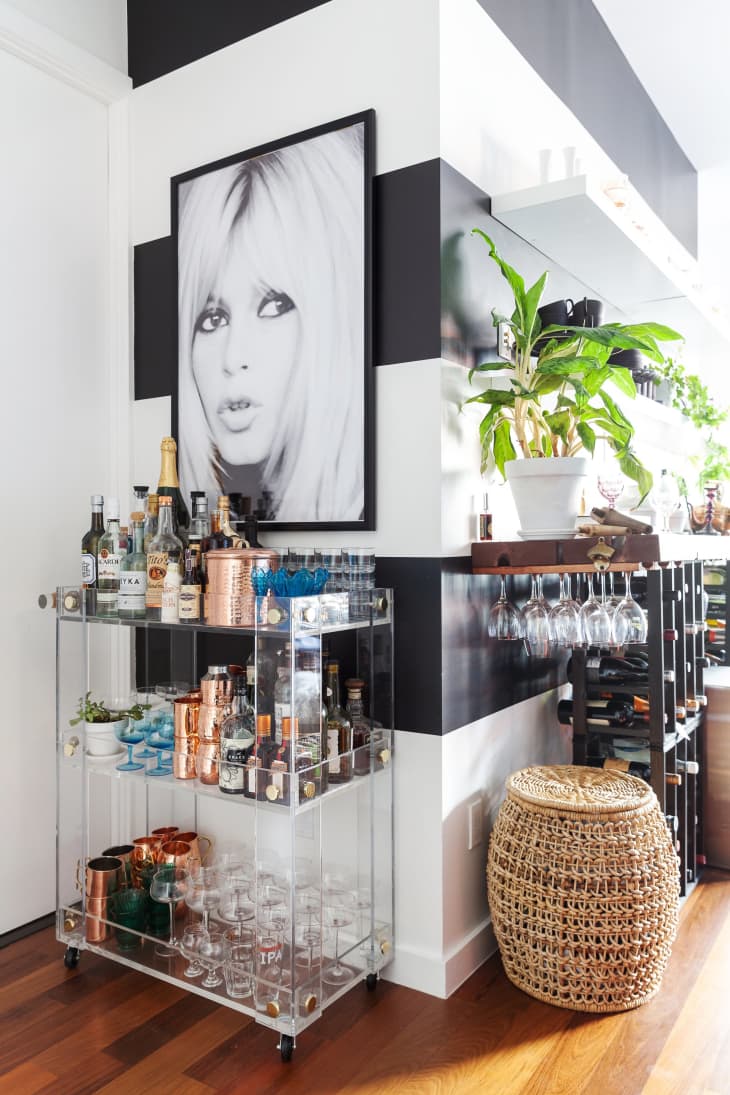
15. Install a cork wall.
The bar-area wall in this London flat has been covered completely in cork to act as a bulletin board. You can do the same in your home and decorate it with anything that inspires you.
16. Create a gallery wall that spans a bigger space.
Gallery walls add interest to a space, covering a huge portion of the wall with your favorite art without you having to shell out the cash for a huge framed painting (they can be excruciatingly expensive). These unique frames and decor elements cover an entire living room wall in this Welsh home.
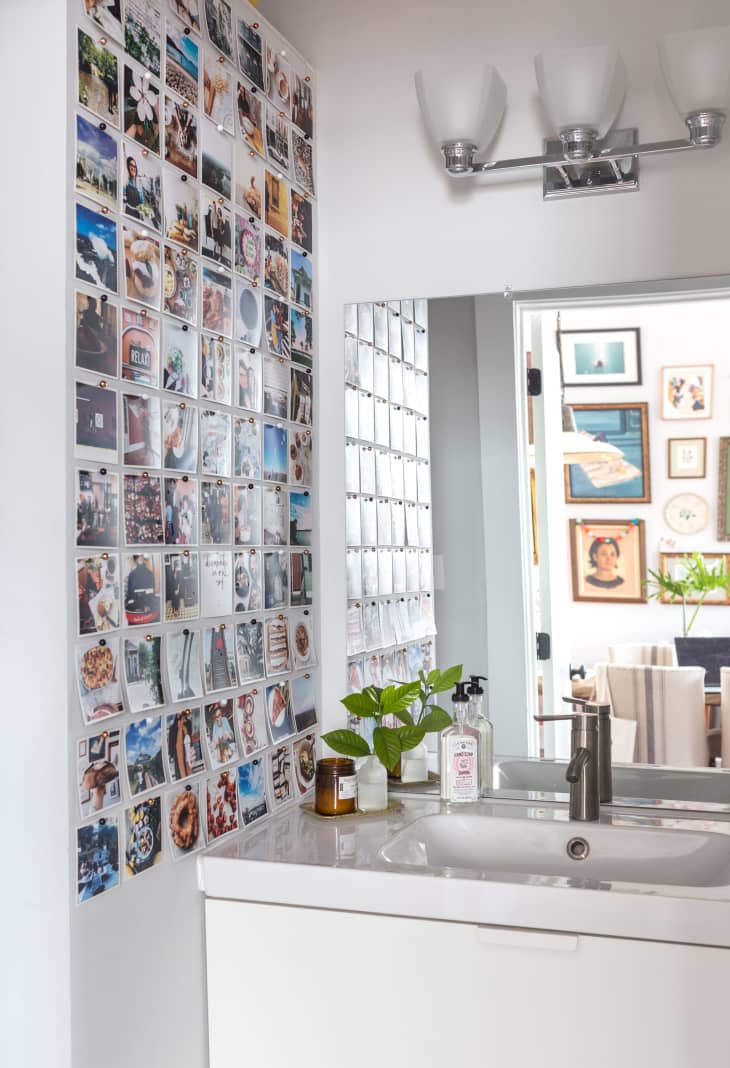
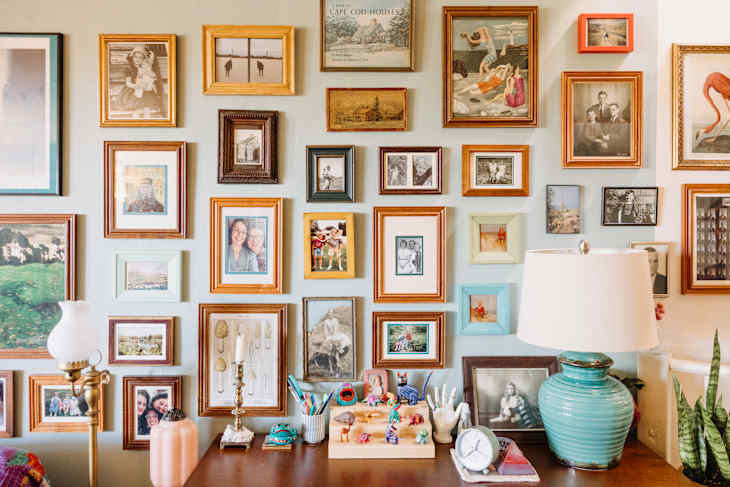
17. DIY a photo collage wall.
This memory wall is affordable to recreate and allows you to showcase all of your loved ones. Just print your photos and hang them in a tidy rectangle using thumbtacks, like this New Orleans homeowner did.
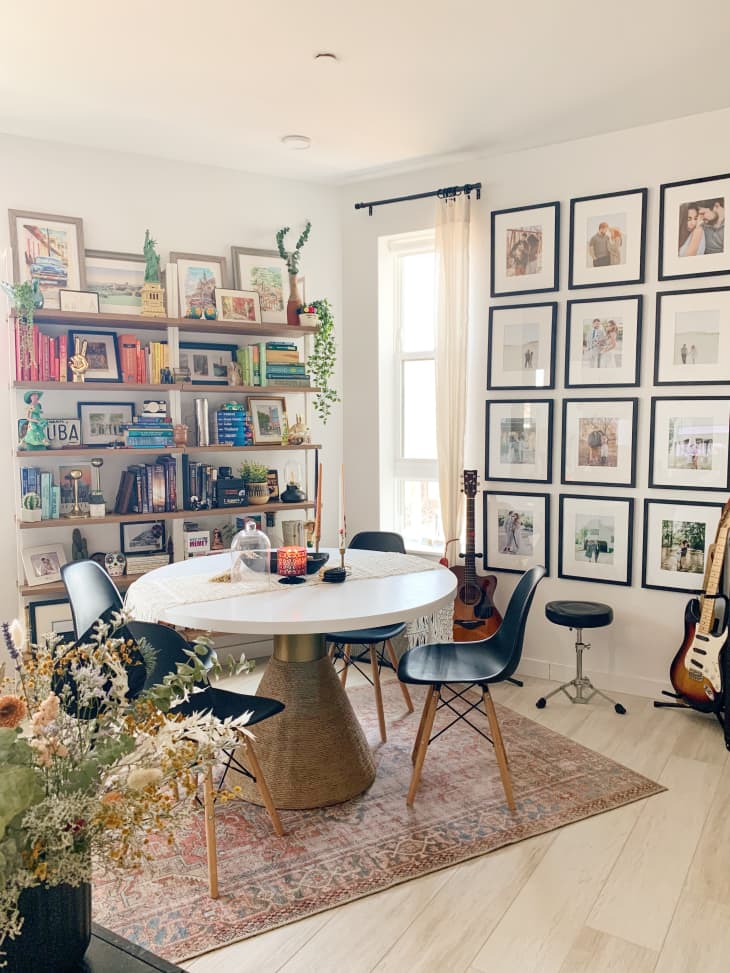
18. More is more.
Between the picture wall and maximalist bookshelf, this rental’s walls are covered.
19. Install all the shelving.
This Nebraska living room has all the shelves. The hexagonal shelves add a unique touch while the open shelving offers a home for even more décor.
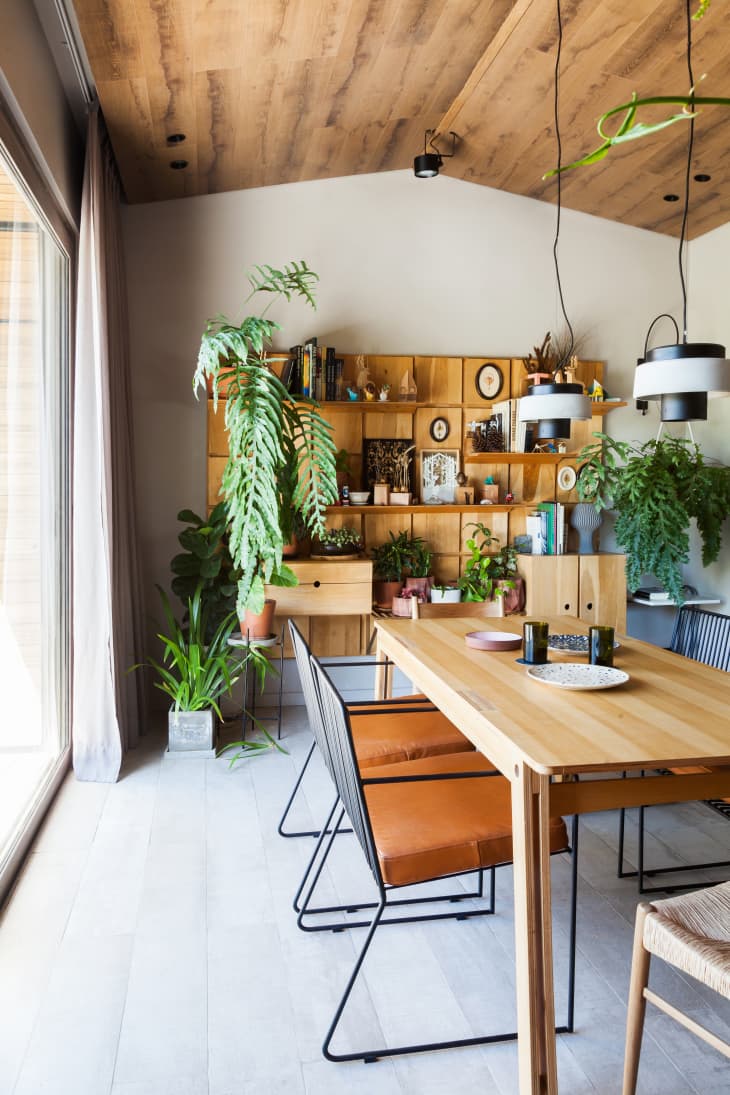
20. Go for an XXL shelving system.
This Buenos Aires dining room has a shelving system that covers almost an entire wall, offering plenty of room for decorative accents and smaller wall art.
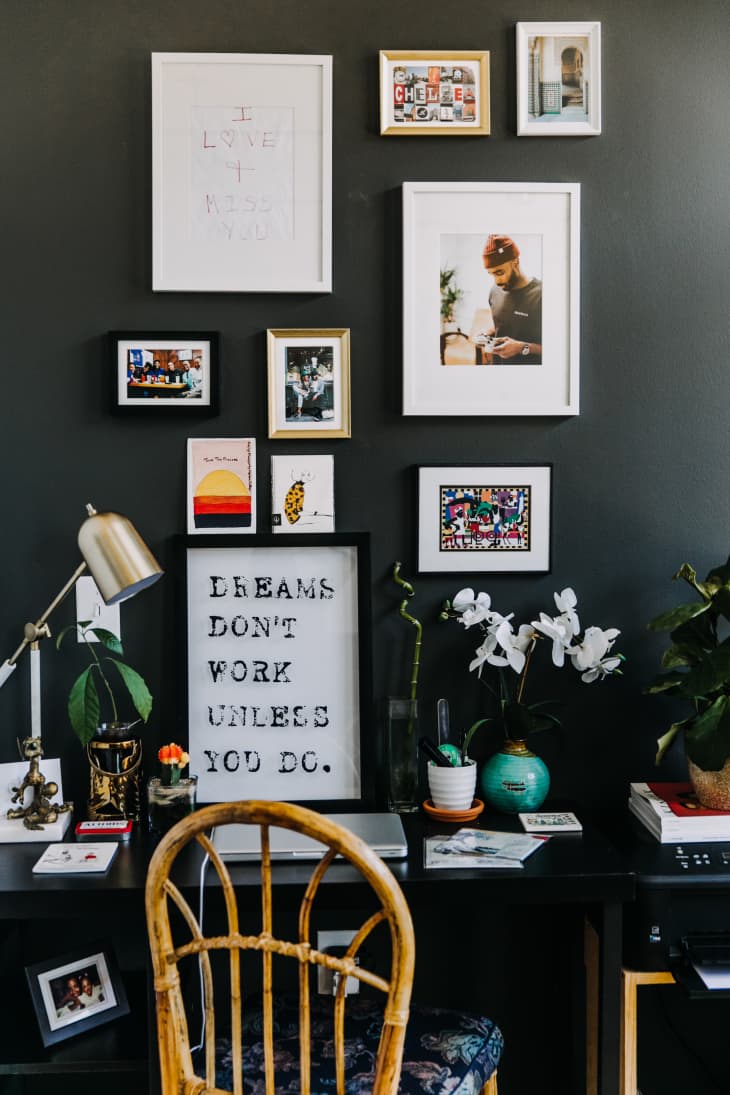
21. Try a contrasting gallery wall.
For walls that already have some personality and color, choose items and frames that will pop against that backdrop, as is the case in this Philadelphia home. Black paint is the perfect background for incorporating things like neon colors and white frames.
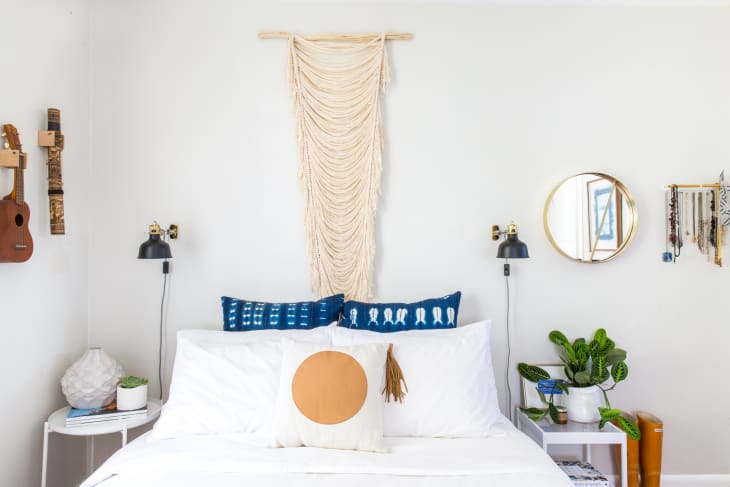
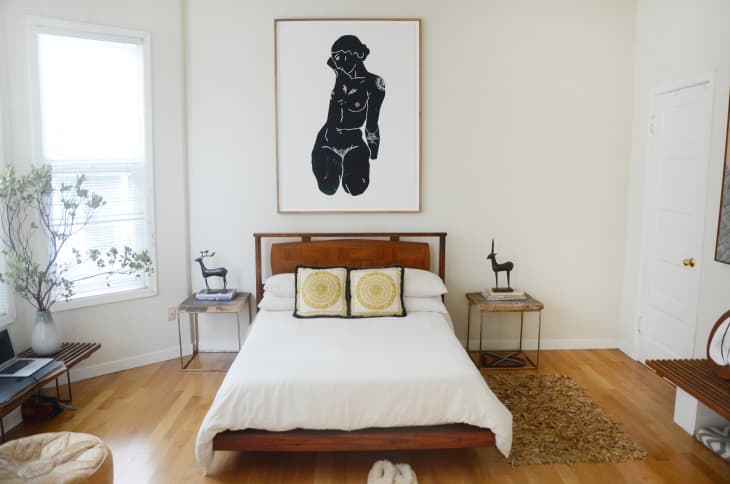
22. Embrace macramé.
Macrame is back, and it’s not going anywhere. This artsy craft form infuses plenty of texture and handmade charm into a space, whether you choose to incorporate a plant hanger or a wall hanging, like the one above the bed in this Los Angeles home.
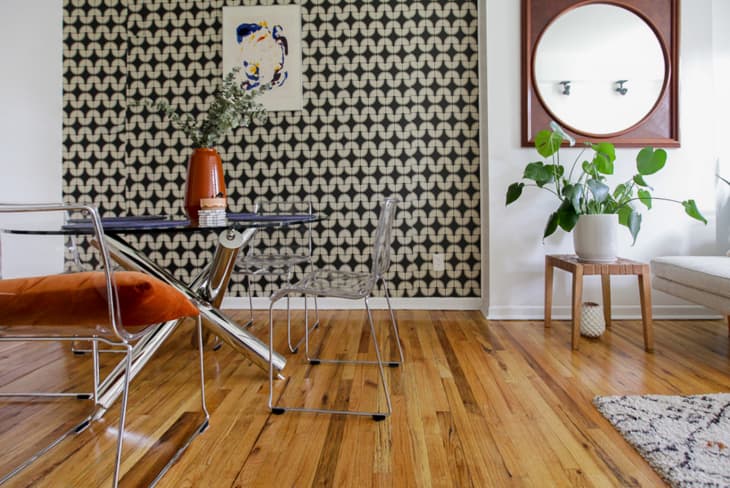
23. Try temporary wallpaper.
There’s no better way to spice up a room in less than a few hours than temporary wallpaper. This New Jersey home shows how a mix of patterns and colors against a graphic but very neutral wallpaper can instantly make a room pop.
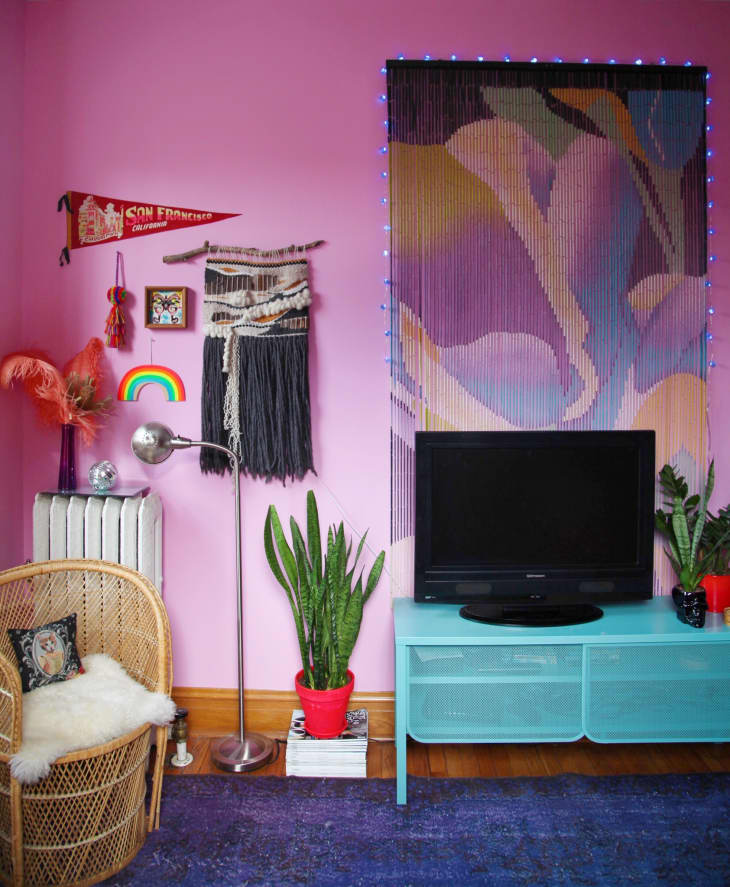
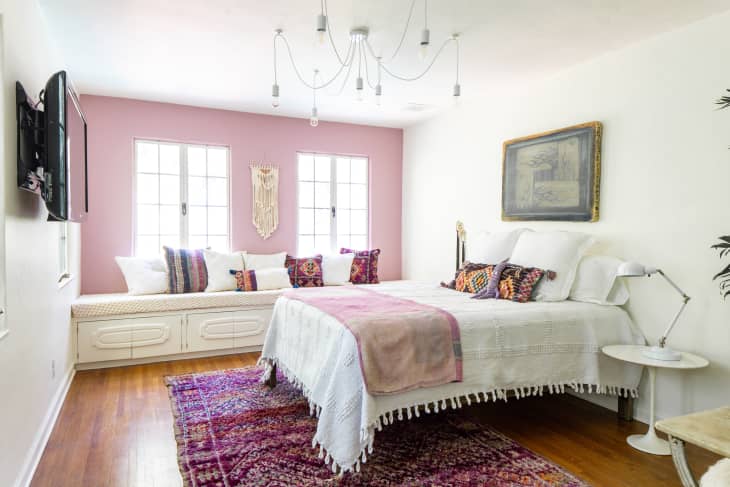
24. Mix and match.
Gallery walls aren’t limited to framed photos and prints. These Chicago homeowners used a pennant, fabric hangings, tassels, and other ephemera in the sweet, small composition on their pink living room wall. They even used a beaded curtain and twinkle lights to create a funky, fun backdrop for their television.

25. Pile on all the textures.
Dressing up your walls with items that coordinate with the rest of the decor in your room is a foolproof way to embrace maximalism, as seen in this Virginia home. Colors and patterns found in wall art can play nicely off of things like throw pillows and rugs.
26. Hang potted wall plants.
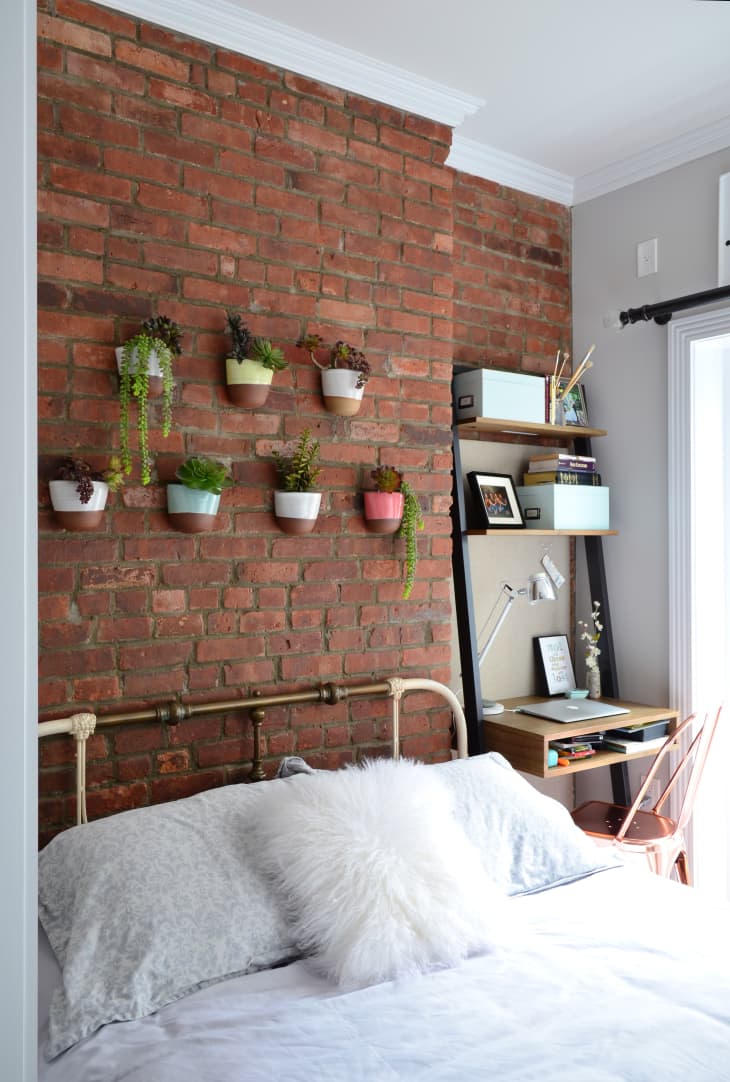
Wall-mounted planters are a great greenery solution for the plant lover with little space. Here, Jessica Sirls created a sleek and space-savvy succulent garden above her bed with just a handful of them.
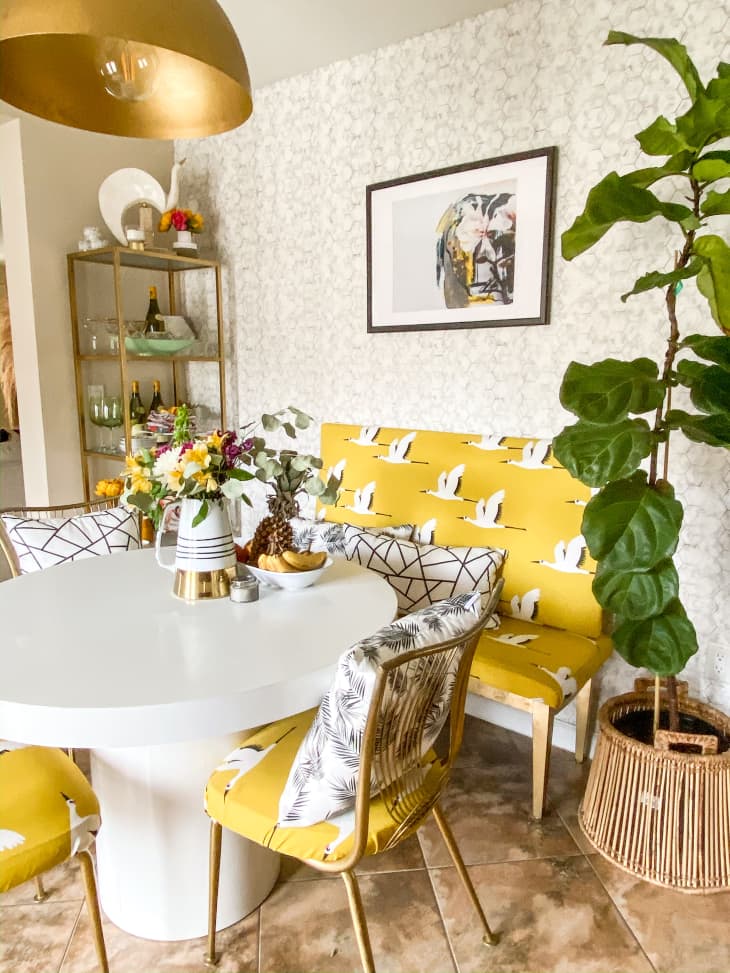
27. Try mixed media wall art.
A mix of prints and sculptural wood pieces stand out against mint green paint in this colorful Florida home. The addition of a lamp, basket, and potted plant help to play up the bright hues in the artwork even more.
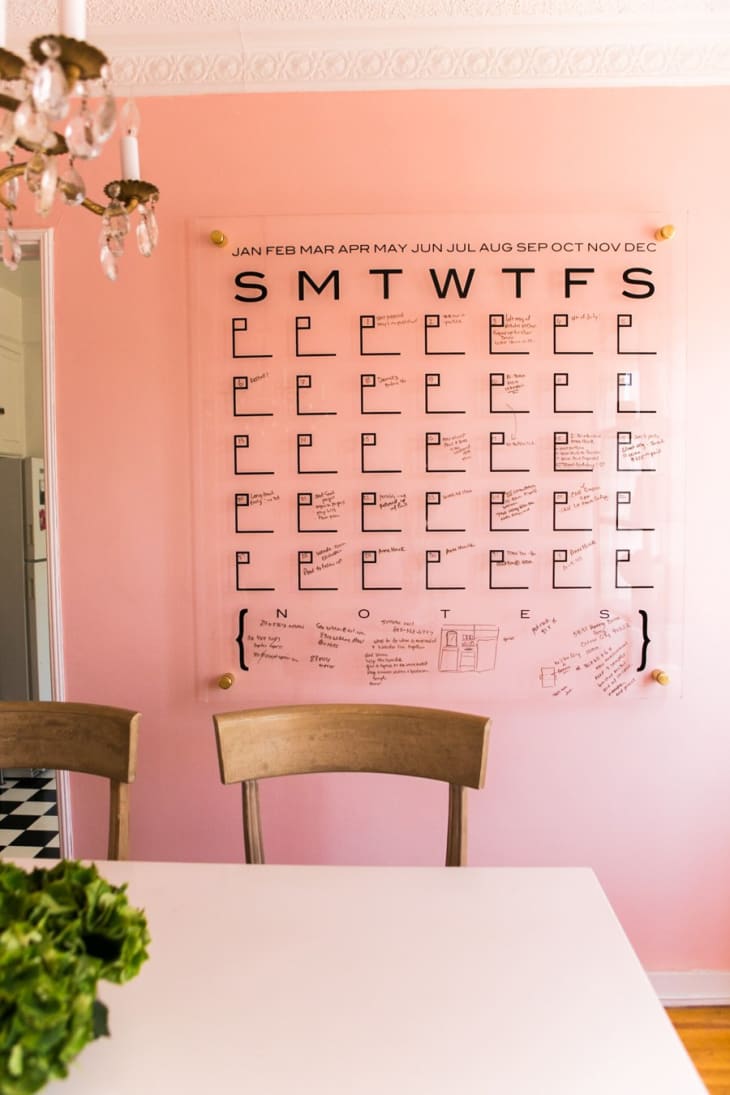
28. Try a calendar wall.
A large Lucite calendar turns a blank wall into a handy organizational tool without sacrificing an inch of style (as seen in a French-inspired LA home tour).
29. Make a statement ceiling.
While you’re thinking about wall decor don’t forget your ceiling — it can serve as an additional surface you can decorate. Oft overlooked but still oozing with design potential, statement ceilings are a stylish way to turn a ceiling into a room’s centerpiece. Fashion your own with paint or wallpaper (like this house tour in Limerick, Ireland did) and make a big interior statement with your ceiling.
30. Hang one or more mirrors.
Minimalists and those occupying smaller spaces will appreciate how much a mirror can add to a bare wall, as exemplified in this pretty New York apartment. Mirrors open up a room by creating the illusion of extra space — and add a nice shape to your walls while they’re at it.
31. Hand-paint a mural.
If the thought of smoothing out air bubbles from wallpaper makes you cringe, this fun Kentucky home provides the perfect example of how to stylishly avoid that: Paint a wall mural. Whether abstract or pictorial, murals are equally as gorgeous as any wallpaper and will give you plenty of creative freedom to decide what colors and shapes you want on your walls.
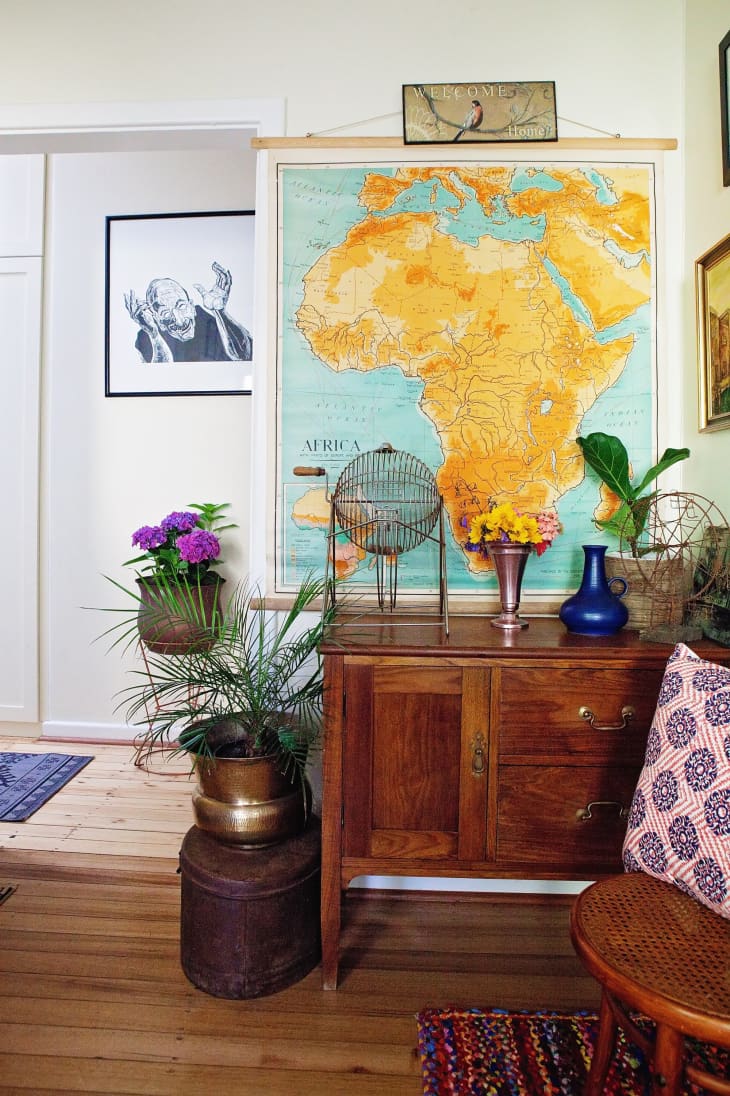
32. Map it out.
An oversize vintage map, like this one from Helen’s home tour, fills an oddly shaped wall with color and character in no time.
33. Put a mural on it.
Turn a blank wall into a focal piece with a graphic wall mural (like this one from Nic and Andrew’s home tour. Many different kinds of wallpaper murals can be found all over the web, and if you’re a renter, fret not: removable ones look just as cool.
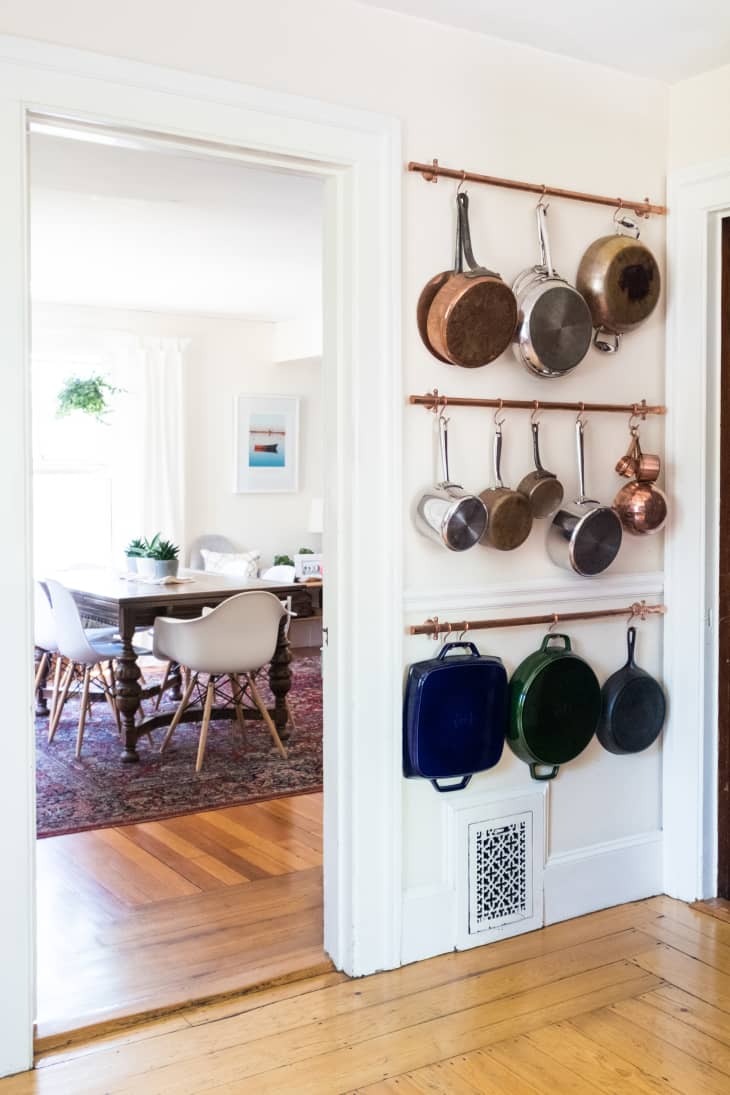
34. Score some storage.
No room in your tiny kitchen to store all your pots and pans? Turn a sliver of a wall into a streamlined storage display with a few hanging rails, like these copper ones from Zan’s home tour.
35. Consider a wall sconce.
Wall sconces are a fashionable way to brighten up a light-deprived area of your home. Mount a pair on either side of your bed in place of bulky table lamps, or employ a single swanky sconce (like this hanging one from a home tour of an airy home in Silver Lake, Los Angeles) for a sleek but functional reading light.
36. Go for faux brick.
Love the look of exposed brick but stuck working with drywall? Brick-inspired wallpaper, like we saw in Hetty’s home tour, is all over the web, and looks just as good as the real deal.
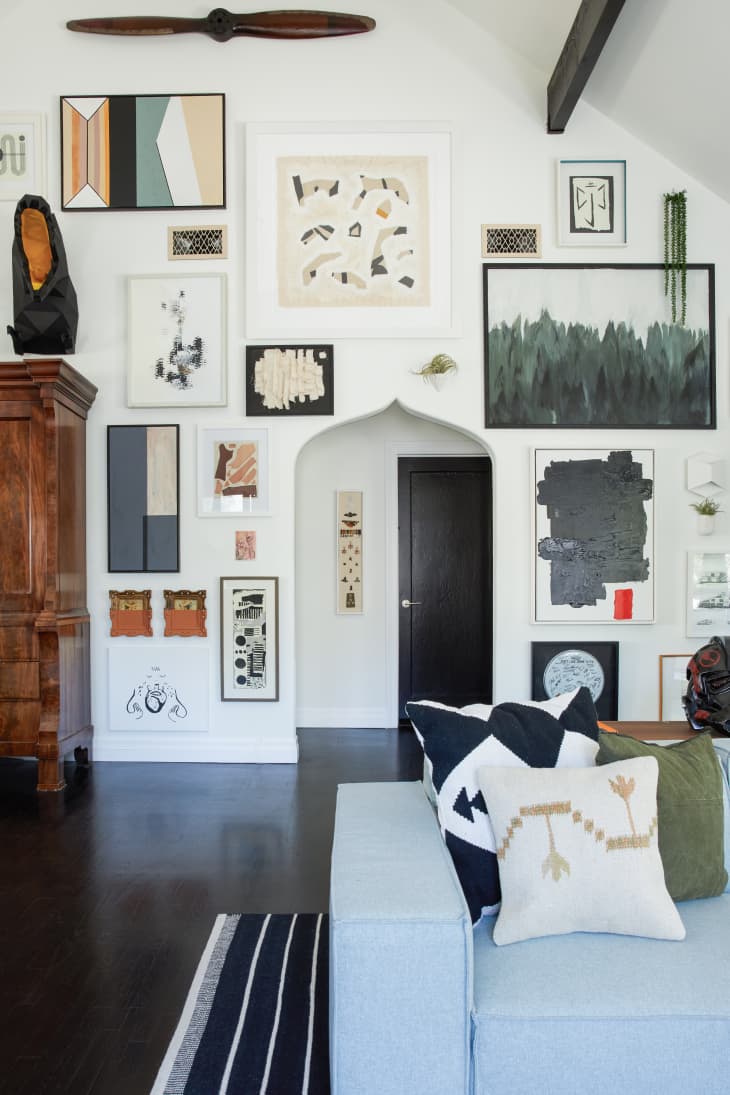
37. Build a gallery wall.
A salon-style art display, like this eclectic gallery wall from a personality-filled Washington, DC home tour, is a space-savvy way to bring some color into your living room. It instantly livens up a white room without overwhelming the rest of space.
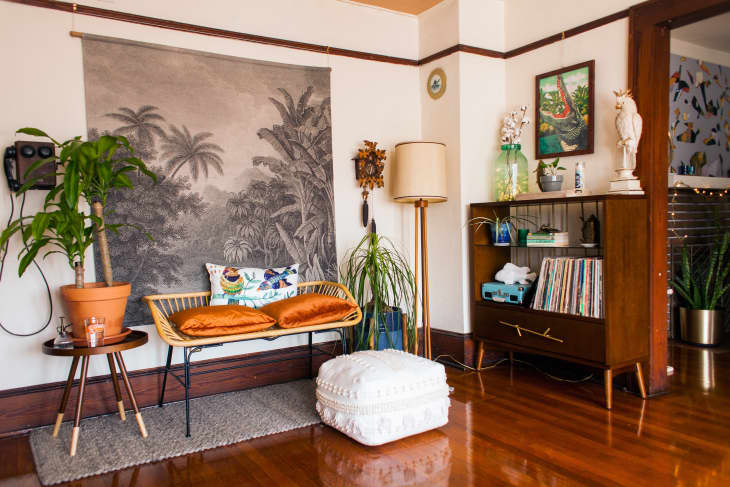
38. Decorate your walls with plants.
You can work plants into your walls in unique ways with pockets, shelves, and wall-mount planters, as seen in this boho apartment. Wall planters are perfectly fine on their own, but feel free to jazz up your setup with items like frames and lights.
39. Push the boundaries on how we do a gallery wall.
Gallery walls do not have to be a small collection of framed prints. They can go far outside the box, like in this star’s Los Angeles home. Hang artwork from floor to ceiling, and incorporate unique pieces like wooden sculptures and vintage found objects.
40. Look to wall baskets.
Who knew wall baskets (you know, the hand-woven kind your grandmother used to buy at garage sales) could make such charming wall decor in modern-day interiors? Clearly this Canadian home shows us that a salon-style installation of wall baskets can look every bit as chic as traditional artwork.
41. Brighten the corners.
Not sure how to decorate a cramped living room corner? Cover the walls with a bold wallpaper or an eye-catching work of art, like we saw on Sarah’s home tour, and turn an unused area into a unique design statement.
42. Make an entrance.
When paired with an interesting light fixture, a flashy work of art turns a standard entry wall into a bright and stylish foyer in seconds, like we saw in James and Kurt’s Chicago home tour.

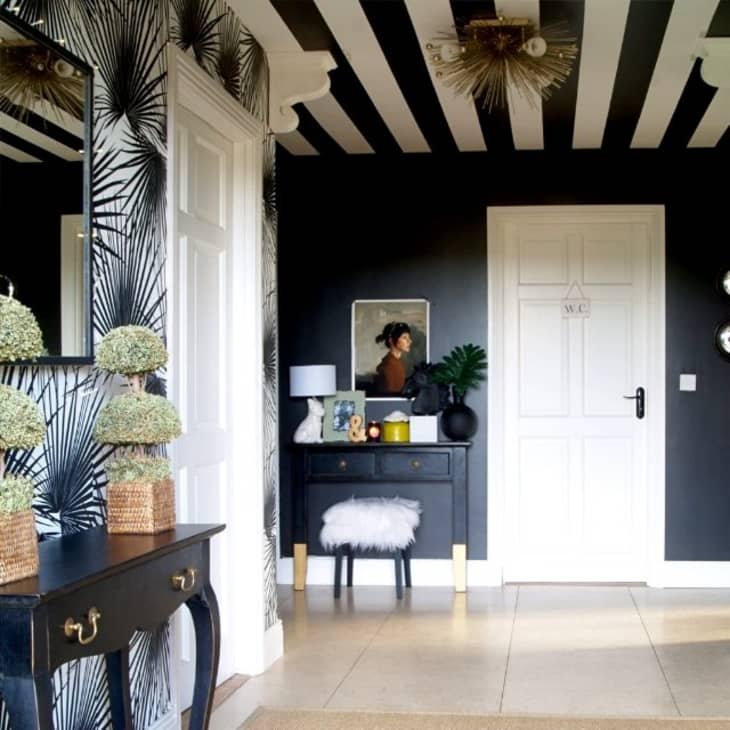
43. Black-and-white is always nice.
Fashion a floor-to-ceiling gallery wall (just like Brady Tolbert did on Emily Henderson’s blog) with nothing but black-and-white images for a clean-lined display that feels classic but contemporary.
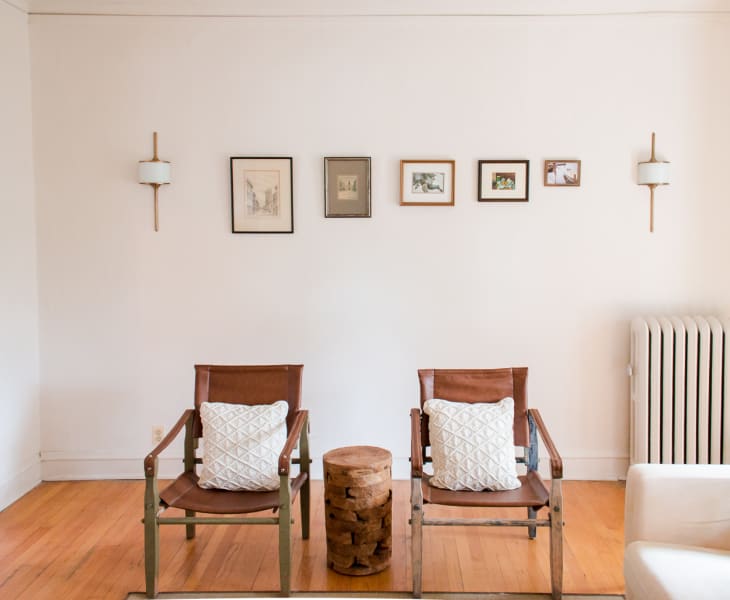
44. Try a style that’s simple but sophisticated.
A simple line of evenly spaced (and cohesively colored) artwork, like this receding gallery wall framed by symmetrical sconces we saw on Jess Goodwin’s home tour, is sometimes all you need to shape a design-forward scene at home.
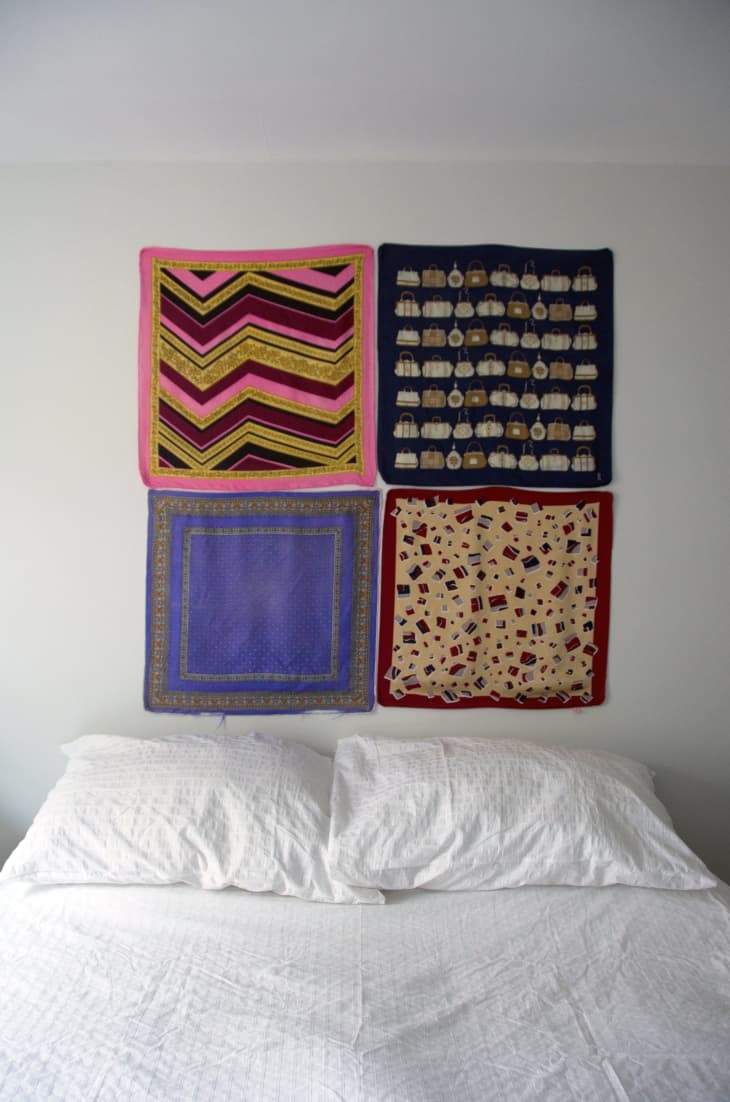
45. Go beyond a headboard.
No room (or budget) for a headboard? No problem. Fun textiles, like these colorful scarves we spotted in Catherine’s home tour, take up just as much wall space, but hardly cost a thing.
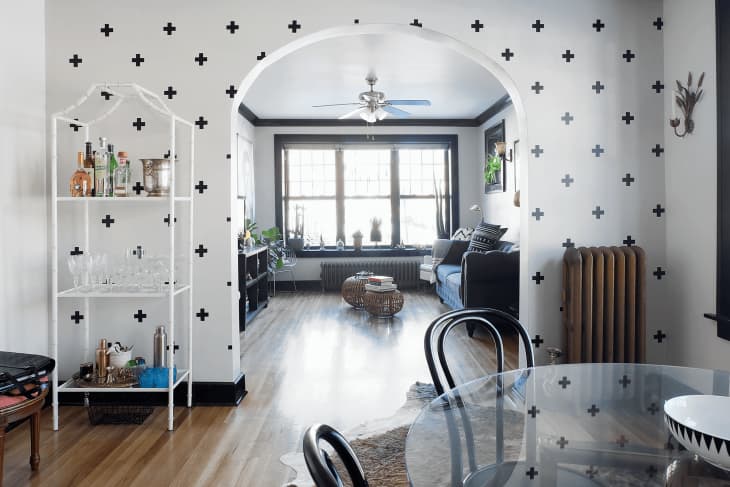
46. Get creative with wall decals.
While you might not have looked at a wall decal since you were a child (anyone else remember those glow-in-the-dark stars?), they’ve come a long way. This Chicago apartment shows that things like washi tape and wall decals can actually look rather sleek and sophisticated if done right.
47. Wallpaper a wall niche.
Those odd divots or cut outs in your wall may not serve much of a purpose, but with a little wallpaper magic you can turn it into an accent wall. As seen in this Brooklyn apartment, a layer of wallpaper quickly turned an awkward area into an eye-catching part of the room.
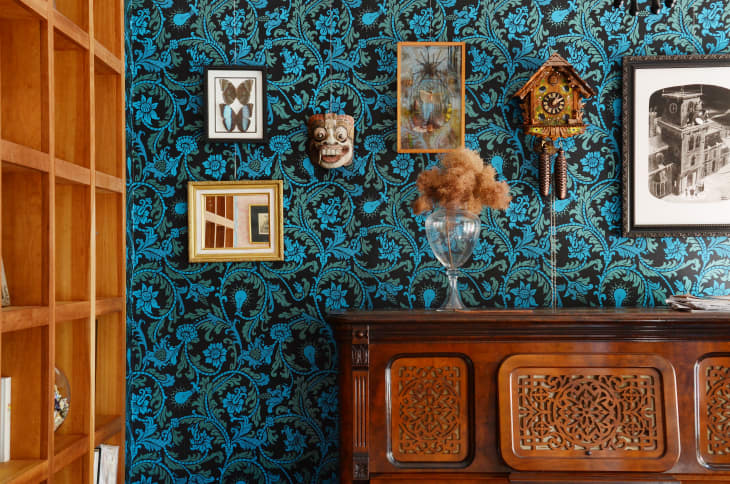
48. Contrasting colors never fail.
A San Francisco apartment’s walls are a maximalist’s dream thanks to wild wallpaper and unique frames and objects. Don’t be afraid to think outside the box when it comes to hanging up art and consider replacing a plain background with something a little more edgy.
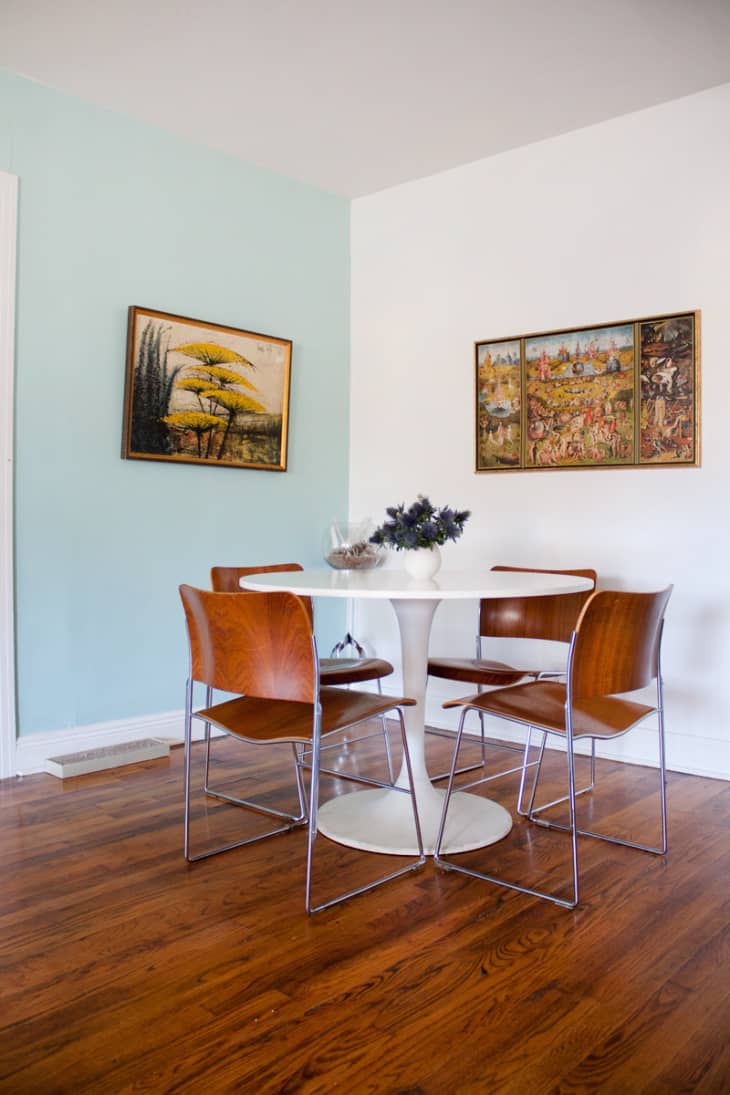
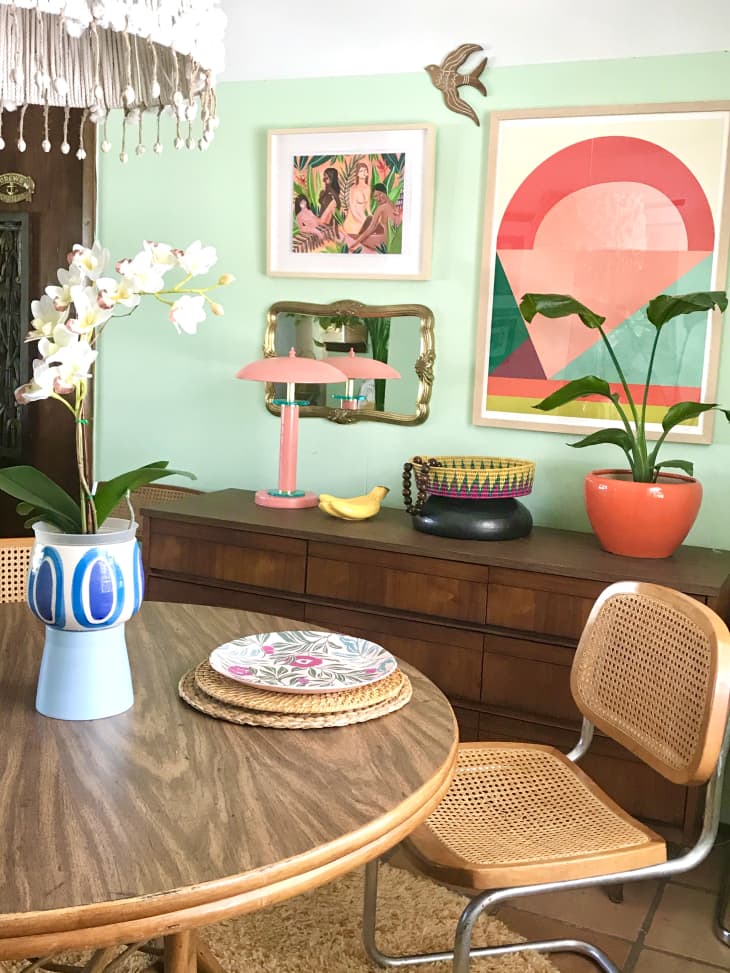
49. Go for a mirror image.
Matchy-matchy decor can be a gorgeous way to decorate walls, and this Austin home’s take on it is especially unique. With two fairly similar frames opposite one another and identical chairs around the table, the space almost feels reflective, like a mirror.
50. Tie in like colors.
Even if your decor is different, a similar color palette can pull it all together, as exemplified by this country home. Here, a bright coral canvas, mirror frame, and wallpaper all fit well together because of their hue despite them being completely different styles.
51. Minimal can be bold.
While it can be fun to go all out with funky wall decor, this San Francisco apartment shows that less often is more. If you consider yourself to lean more towards minimalism, all it takes is one large statement piece of artwork to hugely influence the room.
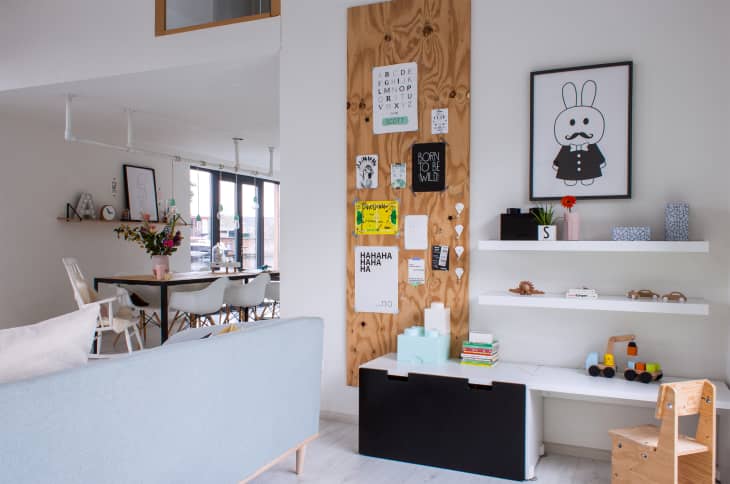
52. Try the unfinished look.
A piece of unpainted plywood creates a modern utilitarian atmosphere in a corner of a house boat in Amsterdam. It serves as a unique background for papers and pieces of art and gently breaks up the white walls.